What we treat
We’re specialists in neuromusculoskeletal physiotherapy, which covers:
Achilles Tendonitis / Tendinosis
1. DEFINITION & ANATOMY
The Achilles tendon is the strong, fibrous cord that connects the calf muscles (gastrocnemius and soleus) to the heel bone (calcaneus). It plays a crucial role in walking, running, and jumping by helping to push off the ground. Pain in this area is commonly grouped under the term Achilles tendinopathy, which describes pain localised at the back of the heel or slightly above it. This condition typically presents as either Achilles tendonitis, an acute inflammatory irritation often reacting to a sudden increase in load, or Achilles tendinosis, a more degenerative condition related to chronic overload that causes changes in the tendon’s structure. Tendinopathy can affect the middle portion of the tendon (mid-portion) or where it attaches to the heel bone (insertional).
2. SYMPTOMS & SIGNS
- Pain located at the back of the heel or a few centimetres above it.
- Morning stiffness or significant “first-step” pain upon getting out of bed.
- Tenderness when touching the area, with possible warmth, swelling, or a noticeable thickening of the tendon.
- Pain that increases with activities that require push-off, such as hopping, running, or walking uphill.
- A crackling or grating sensation (crepitus) may be present in acute cases.
- Reduced power or a feeling of weakness in the calf muscle.
- Stiffness that eases with gentle movement but worsens after a period of heavy or sustained activity.
- For insertional tendinopathy, pain can be aggravated by shoes rubbing against the back of the heel.
3. CAUSES & RISK FACTORS
- Sudden increases in training intensity, such as adding volume, speed, or hill work too quickly.
- Repetitive overload from activities like running and jumping without adequate recovery.
- Poor strength in the calf muscles or supporting muscles around the hips.
- Limited ankle flexibility, particularly the ability to bend the foot upwards (dorsiflexion), and tight calf muscles.
- Altered foot mechanics, such as flat feet or overpronation (foot rolling inwards excessively).
- Returning to sport or activity too quickly after a layoff period.
- Certain medications (e.g., fluoroquinolone/quinolone antibiotics, statins) can increase risk.
- Higher incidence in males aged between 30 and 60.
- Regularly training on hard surfaces or using unsupportive footwear.
- Other factors like a high BMI or systemic conditions such as diabetes or inflammatory arthritis.
4. HOW PHYSIOTHERAPY HELPS
- Thorough Assessment: We evaluate your walking and running pattern (gait), foot posture, ankle mobility, and calf strength and endurance. This helps us make a precise diagnosis and rule out other issues like plantaris involvement, bursitis, or a partial tear.
- Load Management Plan: We will help you temporarily modify aggravating activities like speed work, hills, or jumping, while showing you how to maintain your general fitness safely.
- Progressive Tendon Loading: Your treatment will be built around an evidence-based exercise programme. This includes specific calf strengthening exercises (like eccentrics and heavy slow resistance), isometrics for pain relief, and a gradual progression to jumping and running drills.
- Manual Therapy: We may use hands-on techniques such as soft tissue massage and joint mobilisations to improve mobility and reduce symptoms where appropriate.
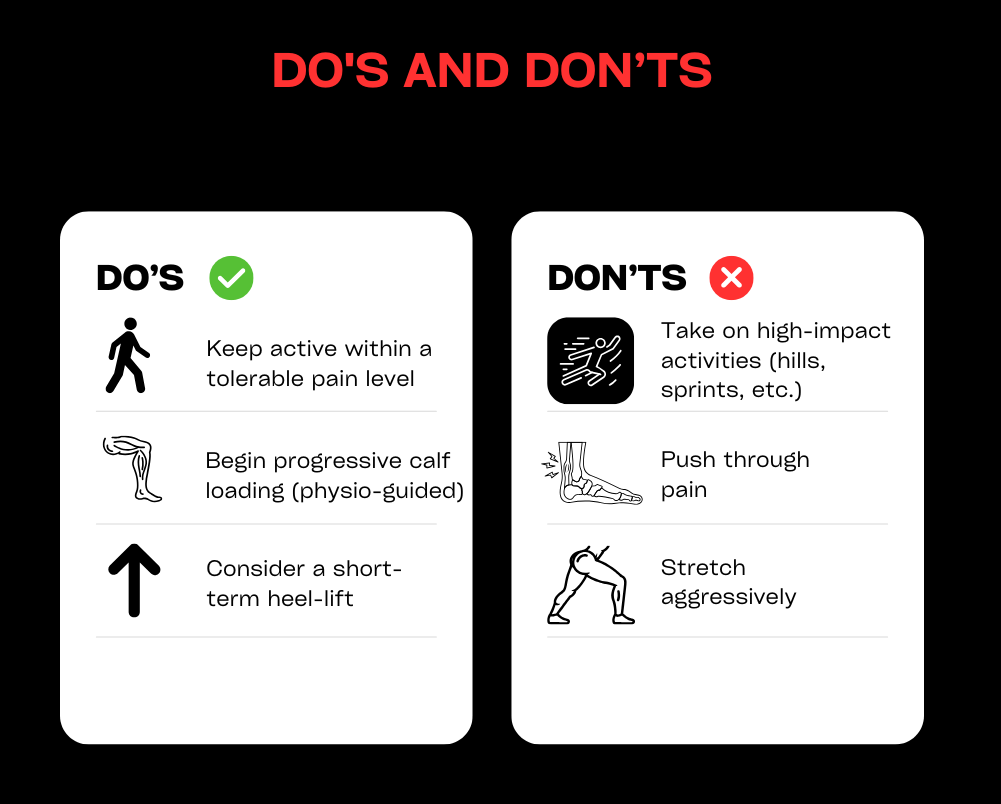
- Adjuncts: We can provide taping for support, advise on short-term heel lifts (especially for insertional cases), and may use shockwave therapy if your condition is not progressing as expected. We also offer guidance on footwear and orthoses.
- Education: A key part of recovery is understanding your condition. We will teach you how to pace your activities, warm up correctly, and monitor your symptoms using acceptable pain guidelines.
5. TIMELINE / EXPECTED RECOVERY
- Reactive/Acute Tendonitis: With early and effective load management and targeted exercises, symptoms often improve significantly within 4–6 weeks.
- Tendinosis/Chronic Tendinopathy: This condition requires a more patient approach. It typically takes 8–12 weeks or more of a consistent, progressive loading programme to see meaningful improvement, with full resolution sometimes taking several months.
- Insertional Cases: Tendinopathy at the heel bone attachment can sometimes progress more slowly than mid-portion issues.
- Your outcome is strongly predicted by how consistently you perform your exercises and manage your activity levels.
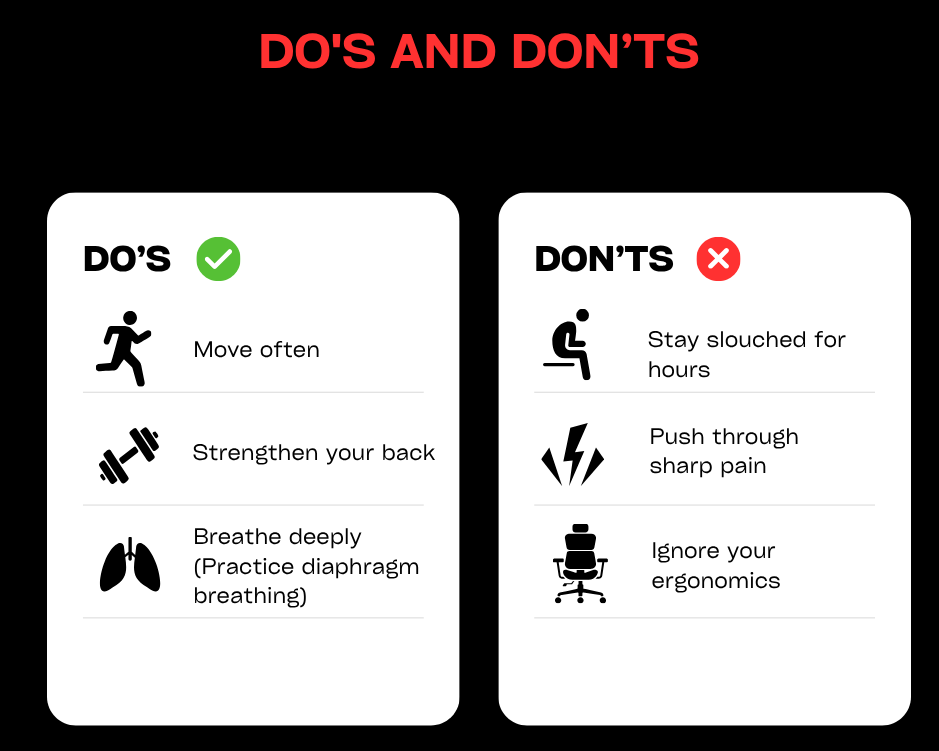
6. SELF-HELP & PREVENTION
- Temporarily reduce activities that cause significant pain, but keep moving within comfortable limits (e.g., cycling, swimming, or walking on flat ground).
- Begin gentle calf-loading exercises as advised by your physiotherapist, starting with isometrics and moving to slow, controlled calf raises.
- If your calves are tight, perform regular gastrocnemius and soleus stretches. Initially, avoid stretching that causes direct compression pain for insertional cases.
- Use temporary heel lifts or wear shoes with a slightly higher heel to reduce strain on the tendon in the early stages.
- When reintroducing activities like running, do so gradually. Be cautious with sudden increases in hills, speed work, or jumping.
- Work on strengthening your hip and foot muscles, check your footwear for signs of wear, and consider orthoses if overpronation is a factor.
- Use ice or heat for short periods for symptom relief, and prioritise your overall training load management and sleep for better recovery.
7. WHEN TO SEE A PHYSIO OR SPECIALIST
If you feel in doubt about your diagnosis or your achilles problem is not resolving book a physiotherapy assessment with one of our physiotherapists.
Ankle sprains
1. DEFINITION & ANATOMY
An ankle sprain occurs when the strong ligaments supporting the ankle joint are stretched beyond their limits and torn. The most common type is a lateral sprain, caused by the foot turning inwards (inversion), which affects ligaments on the outside of the ankle like the ATFL and CFL. Less common are medial sprains (from the foot turning outwards) or high ankle (syndesmotic) sprains, which involve ligaments above the ankle joint. Ligaments provide stability and proprioception (your sense of joint position). Sprains typically happen from twisting on uneven ground or landing awkwardly during sport, often resulting in swelling and bruising around the ankle bones (malleoli). Without proper rehabilitation, sprains can lead to lasting deficits in mobility, strength, and balance, significantly increasing the risk of it happening again.
2. SYMPTOMS & SIGNS
- Pain on the outer or inner side of the ankle, depending on which ligaments are injured.
- Visible swelling and bruising, which may track down into the foot and toes.
- Tenderness to touch over the affected ligaments.
- Difficulty or inability to put weight on the foot.
- Reduced range of motion, especially when trying to pull your foot upwards towards your shin (dorsiflexion).
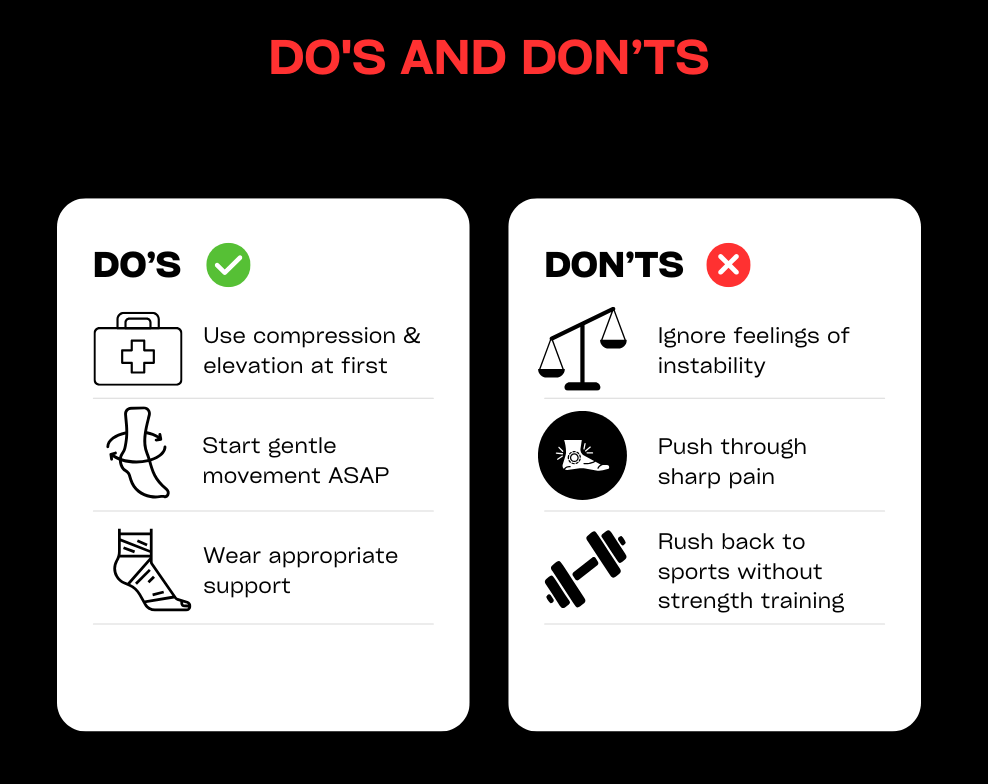
- A feeling of instability, unsteadiness, or the ankle “giving way.”
- Stiffness in the morning or after periods of rest.
- Pain with dynamic movements like hopping, cutting, or changing direction.
- A high ankle sprain may cause pain above the ankle joint, which is worsened by twisting the foot outwards.
3. CAUSES & RISK FACTORS
- Twisting or rolling the ankle during sport (inversion or eversion injuries).
- Walking or running on uneven surfaces.
- A history of previous ankle sprains.
- Poor balance or proprioception (joint position sense).
- Inadequate warm-up before activity.
- Weakness in the supporting muscles, particularly the peroneal and calf muscles.
- Limited ankle mobility or flexibility.
- Wearing inappropriate or unsupportive footwear.
- Participation in high-risk sports like football, netball, basketball, and trail running.
- General fatigue, which can lead to poor movement control.
4. HOW PHYSIOTHERAPY HELPS
- Assessment: We will perform a thorough evaluation to grade the sprain (from mild Grade I to a complete tear Grade III), screen for a possible fracture using the Ottawa Ankle Rules, and differentiate between lateral, medial, or high ankle injuries.
- Acute Care Plan: We provide guidance based on modern principles (PEACE & LOVE), advising on protected weight-bearing, the appropriate use of compression and elevation, and when to use a brace, taping, or crutches.
- Restore Mobility: Treatment includes early, pain-free range of motion exercises (like drawing the alphabet with your foot) and hands-on manual therapy or joint mobilisations to restore normal movement.
- Strength and Control: We design a progressive loading programme to strengthen key muscles (peroneals, calf, tibialis posterior) and guide you through a safe return-to-run and change-of-direction plan.
- Balance & Proprioception: A crucial part of your recovery will be targeted neuromuscular training, using exercises like single-leg balancing and wobble boards to retrain your joint control and significantly reduce re-sprain risk.
- Education and Adjuncts: We help manage swelling, provide soft-tissue techniques, and educate you on load management, correct footwear or bracing, and the clear milestones you need to hit before progressing your activity.
5. TIMELINE / EXPECTED RECOVERY
- Grade I (Mild): Most symptoms typically settle within 1–3 weeks, with a return to sport often possible in 2–4 weeks with consistent rehabilitation.
- Grade II (Moderate): Recovery usually takes 3–6 weeks, with a return to sport taking 4–8 weeks or longer, depending on the physical demands of the activity.
- Grade III (Severe) / High Ankle Sprains: These injuries require more time, often taking 8–12 weeks or more. Some may require a period of immobilisation or specialist input.
- Engaging in early, structured rehabilitation is the most effective way to prevent chronic instability and reduce the high risk of re-injury.
6. SELF-HELP & PREVENTION
- In the first 48–72 hours, follow the principles of protection, relative rest, compression, and elevation. Avoid things that can increase swelling, like heat, alcohol, and deep massage.
- As soon as you can without pain, begin gentle range-of-motion exercises like ankle pumps or drawing the alphabet with your foot.
- Use a supportive lace-up brace or taping when returning to higher-risk activities to provide extra stability.
- As pain subsides, progress to balance exercises and strengthening for your calf and peroneal muscles.
- Reintroduce running, cutting, and jumping gradually, ensuring you meet strength and stability milestones before increasing intensity.
- Choose supportive footwear for your sport and daily activities.
- Maintain good strength in the muscles around your hips and knees to improve overall lower limb control.
7. WHEN TO SEE A PHYSIO OR SPECIALIST
If you feel in doubt about your diagnosis or your ankle problem is not resolving book a physiotherapy assessment with one of our physiotherapists.
Calf strains / tears
1. DEFINITION & ANATOMY
A calf strain or tear is an injury to the muscle fibres at the back of the lower leg. The calf is made up of two main muscles: the gastrocnemius and the soleus. The gastrocnemius is the larger, more superficial muscle that crosses both the knee and ankle joints; it is most active with the knee straight during explosive push-offs. The soleus is a deeper, smaller muscle that works hardest when the knee is bent, playing a key role in endurance and standing posture. Strains often happen during sudden movements like sprinting, pushing off for a tennis shot, or running uphill. Accurately identifying which muscle is injured is crucial as it guides the specific exercises needed for an effective recovery.
2. SYMPTOMS & SIGNS
- A sudden, sharp pain in the back of the lower leg, sometimes accompanied by a pulling or tearing sensation.
- Difficulty walking normally or pushing off the foot.
- Localised tenderness when pressing on the muscle belly.
- Swelling and/or bruising, which may develop over 24-48 hours.
- Stiffness and pain after periods of rest.
- Pain when performing a calf raise (standing on your tiptoes).
- Reduced power or a feeling of weakness in the calf.
- A “pop” sensation may be felt at the moment of injury.
- Gastrocnemius pain is often worse with the knee straight, while soleus pain can be more noticeable with the knee bent.
- In severe cases, a visible gap or defect may be present in the muscle, and you may have a significant limp.
3. CAUSES & RISK FACTORS
- An inadequate warm-up before exercise or sport.
- Sudden increases in running speed, distance, or intensity.
- Explosive changes of direction required in sports like football or squash.
- Underlying tightness in the calf muscles or limited ankle mobility.
- Fatigue, which can lead to poor muscle control and overload.
- A history of a previous calf strain.
- Poor strength or endurance in the calf muscles.
- Weakness in supporting muscles, such as the glutes and hamstrings.
- Poor running mechanics or wearing unsuitable footwear.
- A sudden introduction of uphill running.
- Dehydration or not allowing enough recovery time between hard sessions.
4. HOW PHYSIOTHERAPY HELPS
- Assessment: We will perform a detailed examination to grade the strain (I-III), differentiate between a gastrocnemius and soleus injury, and screen for more serious issues like a complete tear or red flags for a DVT (Deep Vein Thrombosis).
- Acute Management: We guide you on a plan of relative rest, compression, and elevation. We may recommend crutches or temporary heel lifts to reduce load and manage pain, prioritising pain-modulated loading over complete rest.
- Restore Mobility: Your treatment will include gentle, pain-free range of motion exercises, soft-tissue work, and joint mobilisations where needed to restore flexibility without stressing the healing tissue.
- Strength & Loading: We will create a phased exercise programme starting with gentle isometrics, progressing to controlled calf raises (both with the knee straight for gastrocnemius and bent for soleus), and building up to heavy slow resistance, jumping, and running drills.
- Return-to-Sport Criteria: Before you return to your sport, we will ensure you meet key criteria, including symmetrical strength and endurance, and the ability to tolerate hop tests, sprints, and changes of direction.
- Education: We empower you with knowledge on how to pace your recovery, perform effective warm-ups, manage your training load, and monitor symptoms to prevent re-injury.
5. TIMELINE / EXPECTED RECOVERY
- Grade I (Mild): Recovery for everyday activities is often within 1–2 weeks. A return to sport with a full rehabilitation programme typically takes 2–4 weeks.
- Grade II (Moderate): These injuries usually require 3–6 weeks or more, depending on the demands of your activities and adherence to the rehab plan.
- Grade III (Significant Tear): A more severe tear can take 6–12 weeks or longer to heal. Some cases may require medical imaging or a specialist review.
- Following an early, structured loading programme significantly reduces the high risk of re-injury that comes with rushing back to activity too soon.
6. SELF-HELP & PREVENTION
- For the first 48–72 hours, focus on protection, relative rest, compression, and elevation. Avoid aggressive stretching if it causes sharp pain.
- Using small heel lifts in both shoes or wearing shoes with a slight heel can temporarily reduce strain on the calf in the early stages.
- Begin gentle, pain-free isometric contractions as advised. Progress to both straight-knee and bent-knee calf raises as symptoms allow.
- Gradually build your running tolerance. Start on flat surfaces and increase your distance before you increase your speed. Delay hill and sprint work until the later stages of your rehab.
- Maintain good strength in your hips and glutes and work on your ankle mobility. Always include dynamic warm-ups before sport.
- Stay well-hydrated and ensure you have adequate recovery time between hard training sessions.
7. WHEN TO SEE A PHYSIO OR SPECIALIST
If you feel in doubt about your diagnosis or your calf problem is not resolving book a physiotherapy assessment with one of our physiotherapists.

Groin strains and sacroiliac pain
1. DEFINITION & ANATOMY
This section covers two related but distinct issues affecting the pelvis and inner thigh. A groin strain is an injury to the muscles of the inner thigh, most commonly the adductor muscles (especially the adductor longus) or the hip flexors. Sacroiliac (SIJ) pain refers to irritation or dysfunction of the sacroiliac joints, which are located where the base of your spine (sacrum) meets your pelvis. This pain can be related to the joint itself or the strong supporting ligaments. Both conditions can be triggered by the hormonal changes and increased load during pregnancy and postpartum, or by sporting movements like sprinting, changing direction, and kicking. A proper diagnosis is essential as the management for each differs, though strengthening the core and hip muscles is a common focus for both.
2. SYMPTOMS & SIGNS
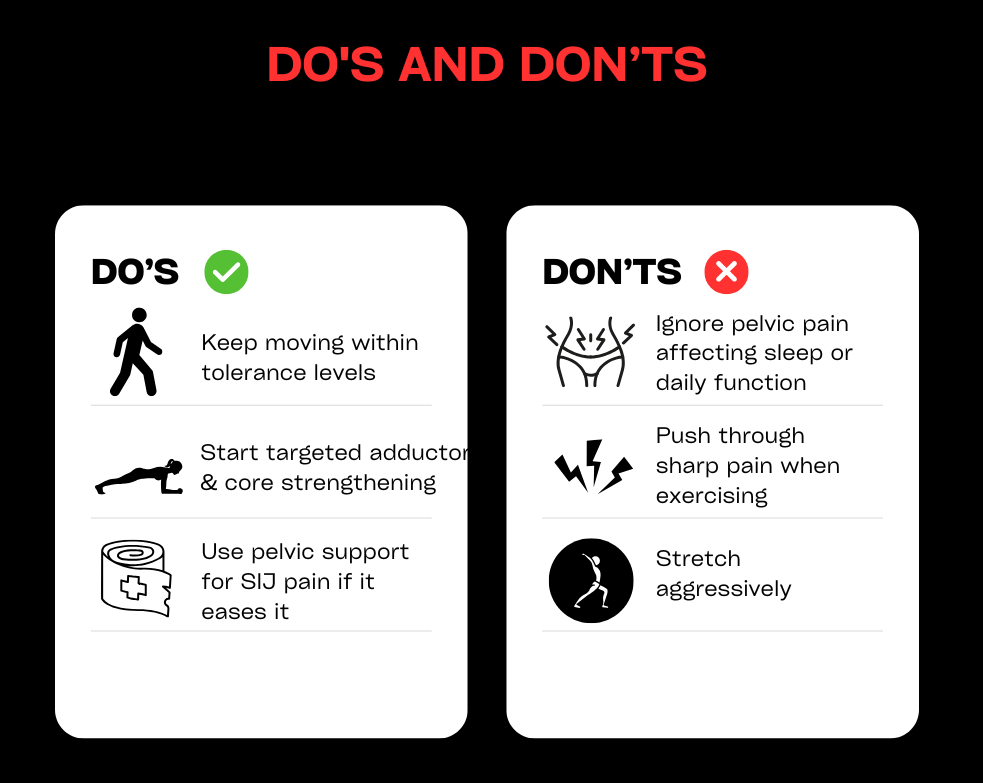
- Groin Strain: A sharp pain in the inner thigh during activities like sprinting, cutting, or kicking; tenderness along the adductor muscles; pain when squeezing your legs together or stretching the inner thigh; possible bruising or swelling; stiffness after rest.
- SIJ Pain: One-sided low back or buttock pain that may refer into the groin; pain that worsens with prolonged standing or walking, rolling over in bed, or climbing stairs; tenderness over the back of the pelvis; pain with standing on one leg.
3. CAUSES & RISK FACTORS
- Pregnancy and the postpartum period, due to the hormone relaxin causing ligament laxity and changes in body load.
- Sudden increases in training intensity or an inadequate warm-up.
- Poor strength in the adductor muscles, hip flexors, deep core, or gluteal muscles.
- An imbalance between the inner thigh muscles (adductors) and outer hip muscles (abductors).
- Participation in sports that involve frequent cutting, kicking, or skating, such as football, hockey, and rugby.
- Poor movement control and coordination.
- A history of a previous groin strain or pelvic pain.
4. HOW PHYSIOTHERAPY HELPS
- Assessment: We perform a detailed evaluation to differentiate between an adductor strain, hip flexor issue, or SIJ-driven pain. We also screen for other potential problems like hip joint pathology or a hernia and consider any pregnancy or postpartum factors.
- Load Management: We help you modify aggravating activities and create a graded plan for your return to running, cutting, and kicking.
- Targeted Exercise: Your rehab will focus on what you need. This may include adductor strengthening (like Copenhagen progressions), core and pelvic stability exercises, and gluteal strengthening. We also address any mobility issues in the hips or spine.
- SIJ Strategies: For SIJ pain, we may recommend a temporary pelvic support belt, teach you specific motor control exercises to improve lumbopelvic stability, and use manual therapy or mobilisations where appropriate.
- Education: We provide advice on posture, optimal sleeping positions, and safe lifting techniques (especially important for perinatal clients), along with clear guidelines for monitoring your symptoms.
- Adjuncts: We may use taping or soft-tissue techniques to manage symptoms. For chronic tendon-related groin pain, shockwave therapy may be an option, but it is not a first-line treatment.
5. TIMELINE / EXPECTED RECOVERY
- Mild Groin Strains: With a proper rehab programme, a return to light sport is often possible within 2–4 weeks.
- Moderate Groin Strains: These typically require 4–8 weeks or more, depending on the demands of your sport.
- SIJ Pain: Symptoms often improve significantly within 4–6 weeks with targeted exercise and load management. Perinatal cases can fluctuate but respond well to tailored support and strengthening.
- Chronic or recurrent cases may require a longer, more progressive programme lasting 8–12 weeks or more.
6. SELF-HELP & PREVENTION
- In the early phase, reduce high-impact activities like sprinting and deep lunges, but stay active with comfortable movements like walking or cycling.
- Begin gentle range-of-motion and pain-free isometric exercises, such as adductor squeezes or core activation, before progressing to controlled strengthening.
- Always warm up thoroughly, including adductor-specific drills, before sports involving kicking or changing direction.
- For SIJ discomfort, you can try a pelvic support belt, practise “log-rolling” to get in and out of bed, and avoid prolonged standing on one leg in the early stages.
- Focus on building well-rounded hip and core strength, address any asymmetries, and prioritise sleep and recovery.
7. WHEN TO SEE A PHYSIO OR SPECIALIST
If you feel in doubt about your diagnosis or your groin problem is not resolving book a physiotherapy assessment with one of our physiotherapists.
Hamstring injuries
1. DEFINITION & ANATOMY
A hamstring injury is a strain or tear affecting the group of three muscles at the back of the thigh (biceps femoris, semitendinosus, and semimembranosus). These injuries typically occur via one of two common mechanisms: high-speed running, where the muscle is rapidly overloaded as the leg swings forward, or a stretch-type injury from movements like kicking, high-stepping, or doing the splits. In some cases, the injury can involve the proximal hamstring tendon, which attaches the muscles high up on the “sit bone” (ischial tuberosity). A correct diagnosis of the grade and mechanism of injury is essential for guiding an effective rehabilitation plan.
2. SYMPTOMS & SIGNS
- A sudden, sharp pain felt in the back of the thigh.
- A distinct pulling or tearing sensation at the time of injury.
- Difficulty running, accelerating, or even walking normally.
- Tenderness when pressing along the length of the muscle or tendon.
- Bruising and/or swelling appearing on the back of the thigh, sometimes tracking down towards the knee.
- Stiffness and discomfort after periods of rest.
- Pain when performing a straight-leg raise or attempting to stretch the hamstring.
- Pain when resisting knee bending (flexion) or pushing the leg backwards (hip extension).
- Reduced sprint speed or a feeling of lost power.
- For proximal injuries near the sit bone, symptoms can include a deep buttock pain and significant discomfort when sitting.
3. CAUSES & RISK FACTORS
- Having a previous hamstring injury is the single biggest risk factor.
- An inadequate warm-up before intense activity.
- Rapid increases in training volume or speed work.
- Poor hamstring strength, especially eccentric strength (the muscle’s ability to lengthen under control).
- A strength imbalance where the quadriceps are much stronger than the hamstrings.
- Reduced hamstring flexibility or limited hip mobility.
- Weakness in the supporting gluteal and core muscles.
- Poor running or sprinting mechanics.
- General fatigue or inadequate recovery between training sessions.
4. HOW PHYSIOTHERAPY HELPS
- Assessment: We perform a thorough evaluation to grade the strain (I-III), identify the mechanism (sprint vs. stretch), and locate the exact site of injury. We also screen for more significant issues like proximal tendon involvement or a potential avulsion injury.
- Acute Care: We guide you on a plan of relative rest and pain-modulated loading, using compression to manage swelling. We advise on crutch use if needed and educate you on why aggressive stretching should be avoided in the early stages.
- Progressive Loading: Your recovery will be built around a phased exercise programme. This starts with gentle isometrics and progresses to eccentric strengthening (like Nordic curls and Romanian deadlifts) and lumbopelvic control exercises, building a robust foundation for your return to activity.
- Running Rehabilitation: We provide a structured, criteria-based return-to-running plan. This involves specific drills, building up stride length and speed, and safely reintroducing acceleration, deceleration, and changes of direction.
- Mobility & Adjuncts: We use gentle neural and soft-tissue techniques to restore pain-free movement without provoking symptoms. Manual therapy and taping may be used as needed to support your recovery.
- Education: A key part of our role is to teach you about load management, effective warm-up strategies, and how to recognise muscle soreness vs. pain, empowering you to prevent a recurrence.
5. TIMELINE / EXPECTED RECOVERY
- Grade I (Mild): Daily function often returns within 1–3 weeks. A return to running and sport typically takes 2–4 weeks or more with consistent rehab adherence.
- Grade II (Moderate): Recovery usually takes 4–8 weeks, though this can be longer depending on the demands of your sport and the specific injury location (stretch-type injuries can be slower).
- Grade III (Severe) / Suspected Avulsion: These injuries require 8–12 weeks or more. Some cases may need medical imaging and a specialist review.
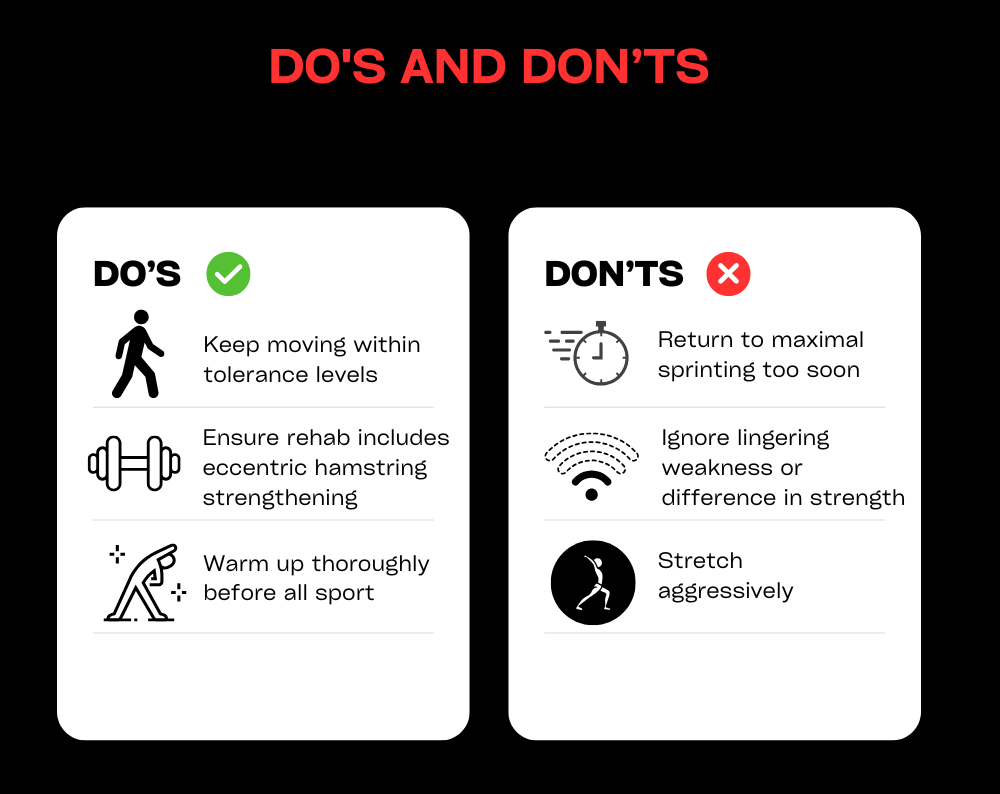
- Following an early, criteria-based rehabilitation programme is the most effective way to reduce the high risk of re-injury.
6. SELF-HELP & PREVENTION
- In the first 48–72 hours, focus on protection, relative rest, and compression. Avoid aggressive stretching, especially if the injury occurred during a stretch.
- Begin gentle, pain-free isometric contractions as advised. Progress to eccentric strengthening exercises (like Nordics, sliders, and RDLs) alongside your glute and core work.
- Reintroduce running gradually, following a walk-jog plan before moving to strides and faster speeds. Avoid maximal sprinting until the final stages of your rehabilitation.
- Always warm up thoroughly before sport, including hamstring-specific preparation drills, and maintain good hip mobility.
- Pay attention to your overall training loads, recovery, and sleep to prevent fatigue-related injuries.
7. WHEN TO SEE A PHYSIO OR SPECIALIST
If you feel in doubt about your diagnosis or your groin problem is not resolving book a physiotherapy assessment with one of our physiotherapists.
Headache
1. DEFINITION & ANATOMY
Headaches have many different causes and subtypes, including tension-type, migraine, cluster, and cervicogenic (neck-related) headaches. Physiotherapy is most effective for treating tension-type and cervicogenic headaches, and can also play a key role in managing the frequency and severity of migraines alongside medical care. Many headaches are influenced by the anatomy of the neck and shoulders. The joints of the cervical spine, key muscles like the upper trapezius and suboccipitals, and the jaw (temporomandibular joint or TMJ) can all refer pain into the head. A careful assessment is vital to classify your headache type, screen for any red flags, and tailor a treatment plan that addresses the true source of your symptoms.
2. SYMPTOMS & SIGNS
- Tension-Type: Usually a bilateral (both sides) pressure or a feeling of a tight band around the head. The pain is typically mild-to-moderate and is not worsened by routine activity.
- Cervicogenic: Often a one-sided pain that starts in the neck or at the base of the skull and spreads to the front of the head. It is commonly associated with reduced neck movement and tenderness in the upper neck muscles.
- Migraine: Typically a throbbing or pulsating pain, often on one side of the head, which is aggravated by activity. It is frequently accompanied by nausea, and sensitivity to light (photophobia) or sound (phonophobia).
- Cluster: A severe, one-sided pain usually felt around the eye or temple, accompanied by autonomic signs like a watery eye or nasal congestion on the same side. This type requires urgent GP or neurology input.
- TMJ-Related: A headache felt in the temples, often associated with jaw pain, clicking, or morning tightness in the jaw muscles.
- General Features: Many headache types can be associated with neck and shoulder stiffness, muscular trigger points, disturbed sleep, and can be linked to stress.
3. CAUSES & RISK FACTORS
- Prolonged desk work with poor ergonomics or sustained postures.
- Neck strain from an old injury, such as whiplash.
- High levels of stress or anxiety.
- Poor sleep quality or disruption to your sleep routine.
- Bruxism (unconscious teeth grinding or jaw clenching).
- Dehydration or missing meals.
- Hormonal factors, which can be a significant trigger for migraines.
- Overuse of pain medication.
- Lack of regular physical activity.
- Incorrect prescription for eyewear or other vision issues.
4. HOW PHYSIOTHERAPY HELPS
- Assessment: We perform a thorough examination to classify your headache type and screen for any red flags. This includes a review of your posture and workstation, a detailed cervical spine and TMJ exam, and guidance on using a headache diary.
- Manual Therapy: We use hands-on techniques such as joint mobilisations for the neck and upper back, soft-tissue release for tight muscles, and specific techniques for the suboccipital and TMJ areas to relieve tension and restore movement.
- Exercise Therapy: We prescribe a tailored programme of neck and shoulder blade strengthening exercises, deep neck flexor training, and mobility drills. We also incorporate breathing and relaxation strategies.
- Education: A key part of our approach is empowering you with knowledge. We provide advice on managing triggers, setting up your workstation correctly, and simple self-release techniques you can use at home.
- Adjuncts: Where appropriate, we may use taping for postural support, advise on heat or ice application, and liaise with your GP regarding medication or specialist referral.
5. TIMELINE / EXPECTED RECOVERY
- Tension-Type/Cervicogenic: With consistent adherence to exercises and ergonomic changes, many people experience significant improvement within 4–6 weeks.
- Migraine: As part of a multidisciplinary plan, physiotherapy can help reduce the frequency and severity of migraines over a period of 6–12 weeks or more.
- Chronic Cases: Long-standing or complex headache conditions may require ongoing management. Regular physiotherapy “tune-ups” can be effective for maintaining improvements and preventing flare-ups.
6. SELF-HELP & PREVENTION
- Keep a simple headache diary to track your symptoms and identify potential triggers related to food, activity, or stress.
- For desk work, follow the 20-8-2 rule: for every 20 minutes of sitting, try to spend 8 minutes standing and 2 minutes moving and stretching.
- Incorporate daily mobility and strength exercises like chin tucks, shoulder blade squeezes, and gentle thoracic extensions over a towel or foam roller.
- Optimise your lifestyle factors: ensure you are well-hydrated, eat regular meals, and get consistent, quality sleep.
- Actively manage stress with techniques like paced breathing, brief mindfulness exercises, or simply taking short breaks during a busy day.
- Review your workstation ergonomics and ensure your eyewear prescription is up to date. Consider using a headset for long phone calls to avoid neck strain.
7. WHEN TO SEE A PHYSIO OR SPECIALIST
If you feel in doubt about your diagnosis or your headache problem is not resolving book a physiotherapy assessment with one of our physiotherapists’

Jaw Pain / Clicking
1. DEFINITION & ANATOMY
Jaw pain and clicking are common symptoms of Temporomandibular Disorders (TMD), which affect the temporomandibular joint (TMJ), its disc, and the surrounding muscles. The TMJ is the complex hinge connecting your jaw to your skull, and it works alongside muscles like the masseter, temporalis, and pterygoids to allow you to talk and chew. Symptoms can include pain, clicking or popping sounds, limited opening, or locking. This can be caused by parafunction (like clenching and grinding), excessive gum chewing, poor posture, neck issues, trauma, or stress. Physiotherapy can be highly effective by addressing joint mobility, muscle tension, and the daily habits that contribute to the problem.
2. SYMPTOMS & SIGNS
- Pain in the jaw, temples, or in front of the ear, especially with chewing, yawning, or talking.
- Clicking, popping, or grinding sounds when opening or closing your mouth.
- Episodes of the jaw locking open or closed, or a limited ability to open wide.
- Morning stiffness or soreness in the jaw muscles, often linked to night-time grinding (bruxism).
- Tenderness when pressing on the main chewing muscles on your cheek (masseter) or temple (temporalis).
- Headaches, particularly in the temples.
- Earache, ringing, or a feeling of fullness in the ear without any sign of infection.
- Associated neck and shoulder tension or pain.
- The jaw deviating to one side when you open your mouth.
3. CAUSES & RISK FACTORS
- Teeth grinding or clenching (bruxism), which is often linked to stress and anxiety.
- Habits like prolonged gum chewing, eating very hard or chewy foods, nail-biting, or pen chewing.
- Poor posture, especially a forward head position during prolonged screen time.
- Recent extensive dental work or changes to your bite.
- A direct trauma or blow to the jaw or face.
- Underlying neck dysfunction that refers pain to the jaw.
- Disrupted sleep patterns.
- Generalised joint hypermobility.
4. HOW PHYSIOTHERAPY HELPS
- Assessment: We conduct a thorough assessment to screen for any red flags, examine your jaw’s movement pattern, and check for joint noise or pain. We also assess your neck posture and habits, and will liaise with your dentist or GP if needed.
- Manual Therapy: We use hands-on techniques including TMJ mobilisation and targeted soft-tissue release for the chewing muscles (masseter, temporalis, pterygoids). We also treat the neck and suboccipital muscles to reduce referred pain.
- Exercise Therapy: We will prescribe a specific programme of exercises, including controlled jaw opening and closing drills, gentle isometrics, and postural strengthening for your neck and shoulder blades.
- Education & Habit Change: A crucial part of recovery is learning to manage the condition. We provide strategies for bruxism, relaxation, sleep hygiene, and diet modifications (like eating softer foods initially). We also offer ergonomic advice for your workstation and phone use.
- Adjuncts: We can use taping to provide postural cues and will coordinate with your dentist if a night guard for bruxism is recommended.
5. TIMELINE / EXPECTED RECOVERY
- Many people with mild-to-moderate TMD feel a significant improvement within 4–6 weeks of starting physiotherapy, provided they are consistent with their exercises and habit changes.
- Long-standing or more complex cases may take 8–12 weeks or longer to resolve. These cases often benefit from combined care with a dentist or a psychologist for stress management.
- Flare-ups are common with TMD, but once you have effective self-management strategies in place, they usually settle much faster.
6. SELF-HELP & PREVENTION
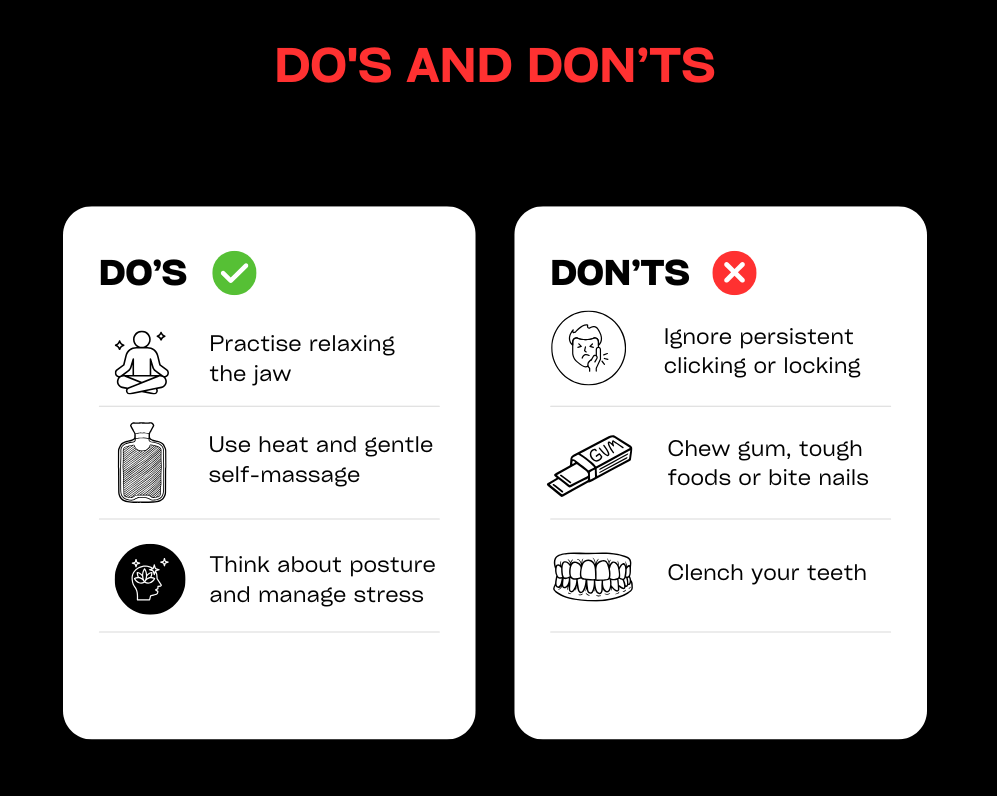
- During a flare-up, avoid extreme jaw opening, tough or chewy foods, and chewing gum. Cut food into smaller pieces to reduce strain.
- Practise a relaxed jaw posture throughout the day: keep your lips together, teeth slightly apart, and let your tongue rest gently on the roof of your mouth.
- Apply a warm pack to your jaw, temples, or neck for 10–15 minutes. You can also perform gentle self-massage to the main cheek (masseter) and temple muscles.
- Take regular posture breaks from your desk and practise chin tucks and shoulder blade squeezes. Limit cradling your phone between your ear and shoulder.
- Actively manage stress, especially before bed. Try paced breathing exercises and aim for a consistent sleep routine.
- If you suspect you grind your teeth at night, discuss getting a custom bite guard with your dentist.
7. WHEN TO SEE A PHYSIO OR SPECIALIST
If you feel in doubt about your diagnosis or your groin problem is not resolving book a physiotherapy assessment with one of our physiotherapists.
Knee Pain/Patellofemoral pain (PFJ)
1. Definition & Anatomy
Patellofemoral pain (PFJ pain) refers to discomfort around or beneath the kneecap (patella). It often occurs due to how the patella moves (or “tracks”) within the femoral groove during activities like walking, running, or squatting. The condition can involve irritation of the cartilage under the kneecap, leading to pain and inflammation.
2. Symptoms & Signs
- Pain when squatting, climbing stairs, or sitting for long periods (commonly called the “theatre sign”).
- Clicking or grinding sensations under the kneecap.
- Swelling, aching, or stiffness in the knee.
3. Causes & Risk Factors
- Overuse or repetitive stress: Activities like running or jumping can overload the knee.
- Poor hip/core strength: Weakness in these areas can lead to poor knee alignment.
- Flat or overpronated feet: This can alter biomechanics and increase strain on the knee.
- Muscle imbalances: An imbalance between the vastus medialis and lateralis muscles can affect patella tracking.
- Sudden increases in activity: Rapidly increasing running distance or intensity can trigger symptoms.
4. How Physiotherapy Helps
- Assessment: A physiotherapist will evaluate your gait, hip and foot biomechanics, strength, and flexibility.
- Treatment Plan: This may include manual therapy, taping, and exercise therapy to improve strength and stability.
- Load Management: Temporary modifications to activities to reduce strain on the knee.
- Modalities: Techniques like ultrasound or other clinic-specific treatments may be used to reduce pain and inflammation.
5. Timeline / Expected Recovery
- Mild cases: With consistent physiotherapy and adherence to exercises, improvement is often seen within 4-6 weeks.
- Severe or long-standing cases: Recovery may take several months, especially if cartilage damage is involved.
6. Self-Help & Prevention
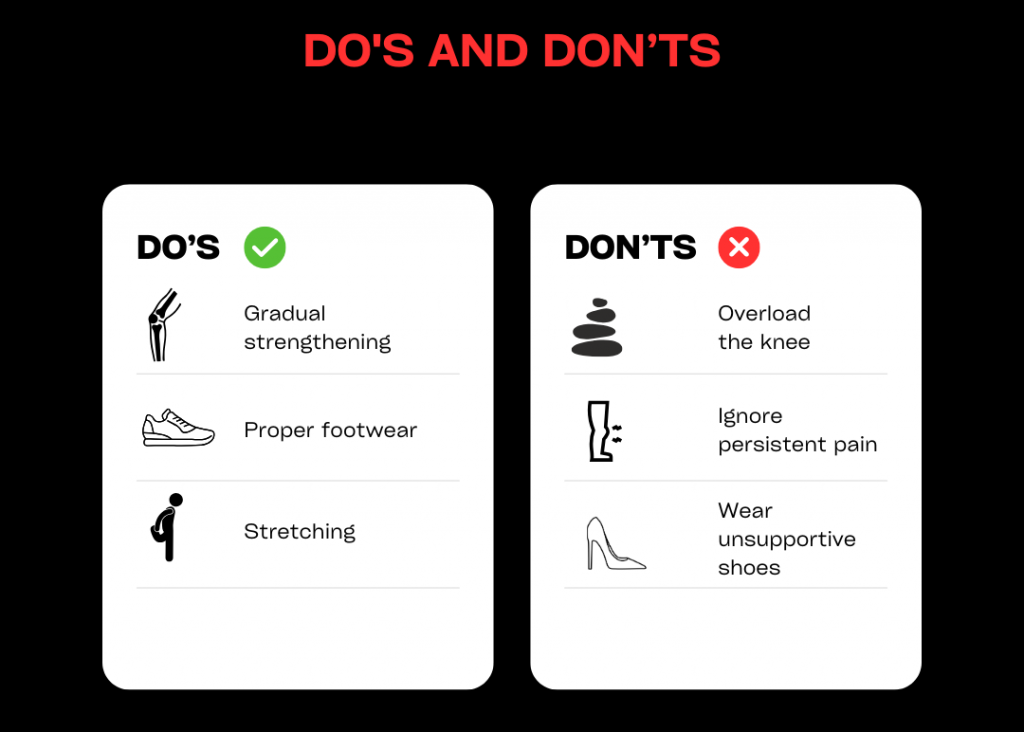
- Strengthen key muscles: Focus on hips, quads, and glutes.
- Stretch tight areas: Pay attention to the IT band, hamstrings, and calves.
- Wear proper footwear: Consider orthotics if needed.
- Avoid rapid increases in activity: Gradually build up running or stair-climbing.
- Use ice and rest during flare-ups to manage pain.
7. When to See a Physio or Specialist
If you feel in doubt about your diagnosis or your knee problem is not resolving book a physiotherapy assessment with one of our physiotherapists.
Don’t let knee pain hold you back. If you’ve been experiencing symptoms for more than 3-6 weeks or your pain is getting worse, book an appointment with one of our physiotherapists today. Let us help you get back to doing what you love, pain-free.
Lower back pain / piriformis syndrome
1. DEFINITION & ANATOMY
Lower back pain is one of the most common conditions affecting people of all ages. Your lower back, or lumbar spine, is a strong, complex structure made up of five vertebrae (L1–L5), shock-absorbing intervertebral discs, small facet joints that guide movement, and a network of ligaments. Key muscles like the deep multifidus, larger erector spinae, and powerful glutes work together to support and move your spine.
Low back pain can be broadly categorised:
Mechanical or Non-Specific Low Back Pain: The most common type, involving pain from the joints, muscles, or ligaments without a specific structural cause.
Disc-Related Pain: Pain arising from an intervertebral disc, which can sometimes bulge or herniate.
Nerve Root Irritation (Sciatica): When a nerve root is compressed or irritated as it exits the spine, causing pain, pins and needles, or numbness down the leg.
Facet Joint Pain: Pain originating from the small stabilising joints on the back of the spine.
Sacroiliac (SI) Joint Pain: Pain from the large joint connecting your spine to your pelvis.
Piriformis Syndrome: A specific condition where the sciatic nerve is irritated or compressed as it passes by or through the piriformis muscle deep in the buttock, mimicking sciatica.
A physiotherapist can accurately diagnose the primary source of your pain and create a targeted treatment plan.
2. SYMPTOMS & SIGNS
Back-dominant vs. Leg-dominant Pain: Pain can be felt mainly in the lower back, or predominantly in the buttock and leg.
Sharp Pain: Often felt with specific movements like bending forward, lifting, or twisting.
Dull Ache: A common symptom after prolonged sitting, driving, or standing.
Morning Stiffness: Difficulty moving or significant soreness upon waking that eases with gentle movement.
Pain on Extension: Discomfort when arching backwards or standing for long periods.
Buttock & Leg Pain: A deep ache in the buttock that may radiate down the back of the thigh, typical of piriformis syndrome or sciatica.
Neural Symptoms: Pins and needles, numbness, or weakness in the leg or foot.
Sitting Aggravation: Pain that worsens with sitting, especially in soft chairs or during driving. Many find relief with standing or walking.
Antalgic Posture: You might find yourself leaning to one side to relieve pressure and pain.
Limited Movement: Difficulty bending forward to touch your toes or extending backwards.
Local Tenderness: The area over your buttock or piriformis muscle may be very tender to touch.
Positive Neural Tension Signs: Tests like the Straight Leg Raise (SLR) or Slump test may reproduce your leg symptoms.
3. CAUSES & RISK FACTORS
Prolonged Sitting & Desk Work: Sustained postures increase load on discs and surrounding muscles.
Deconditioning: A lack of general fitness and poor core or gluteal muscle strength.
Sudden or Awkward Lifting: A sudden, heavy load or using poor lifting mechanics can cause acute injury.
Repetitive Bending or Twisting: Common in manual jobs or certain sports.
Previous Episodes of Back Pain: A major predictor of future episodes.
Poor Sleep & High Stress: These factors can heighten pain sensitivity and impair muscle recovery.
Pregnancy & Postpartum Changes: Hormonal shifts and changes in body mechanics increase strain on the back and pelvis.
Generalised Joint Hypermobility: Can lead to reduced joint stability.
High-Load Sports: Activities involving repeated impact or rotation, like running or golf.
Changes in Footwear or prolonged walking on hard surfaces.
Wallet Neuropathy: Sitting on a bulky wallet in your back pocket can directly compress the piriformis muscle and sciatic nerve.
Anatomical Variations: In some people, the sciatic nerve passes directly through the piriformis muscle, making it more susceptible to irritation.
4. HOW PHYSIOTHERAPY HELPS
Assessment: We perform a thorough assessment to screen for any red flags and classify the main driver of your pain. This includes examining your movement patterns, muscle strength, hip mobility, and neural tension. We will liaise with your GP if further investigation is needed.
Manual Therapy: We use hands-on techniques such as joint mobilisations for the lumbar spine and SI joint, and soft-tissue release for tight paraspinal muscles, glutes, and the piriformis. Where appropriate, we may also use gentle nerve gliding techniques.
Exercise Therapy: You will receive a graded exercise programme tailored to your needs. This may include mobility drills, core control exercises targeting deep stabilisers (multifidus, transverse abdominis), and strengthening for the hips and glutes. As you improve, we introduce progressive loading with movements like hinges, squats, and carries. For certain conditions, we may use McKenzie-style exercises that focus on a preferred direction of movement.
Education & Habit Change: Understanding your pain is key. We provide education on pain science, strategies for pacing your activity, and advice on taking regular breaks from sitting. We also offer ergonomic guidance for your workstation, advice on sleep positions, and simple tips like removing your wallet from your back pocket.
Adjuncts: We may use taping for postural feedback or short-term pain relief, alongside guidance on using heat or ice. We can also collaborate with your GP regarding pain medication if required.
5. TIMELINE / EXPECTED RECOVERY
Non-Specific/Mechanical Pain: Most acute episodes show significant improvement within 2–6 weeks with consistent physiotherapy and adherence to your home exercise programme.
Disc or Radicular Pain: These conditions can take longer to resolve, often requiring 6–12 weeks or more for the nerve to settle and strength to be fully restored.
Piriformis Syndrome: Typically responds well to targeted treatment within 4–8 weeks, provided contributing factors like sitting habits are addressed.
Flare-ups are common with back pain, but the goal of physiotherapy is to equip you with the self-management skills to control them quickly and effectively. Progressive loading and building resilience is crucial for long-term success.
6. SELF-HELP & PREVENTION
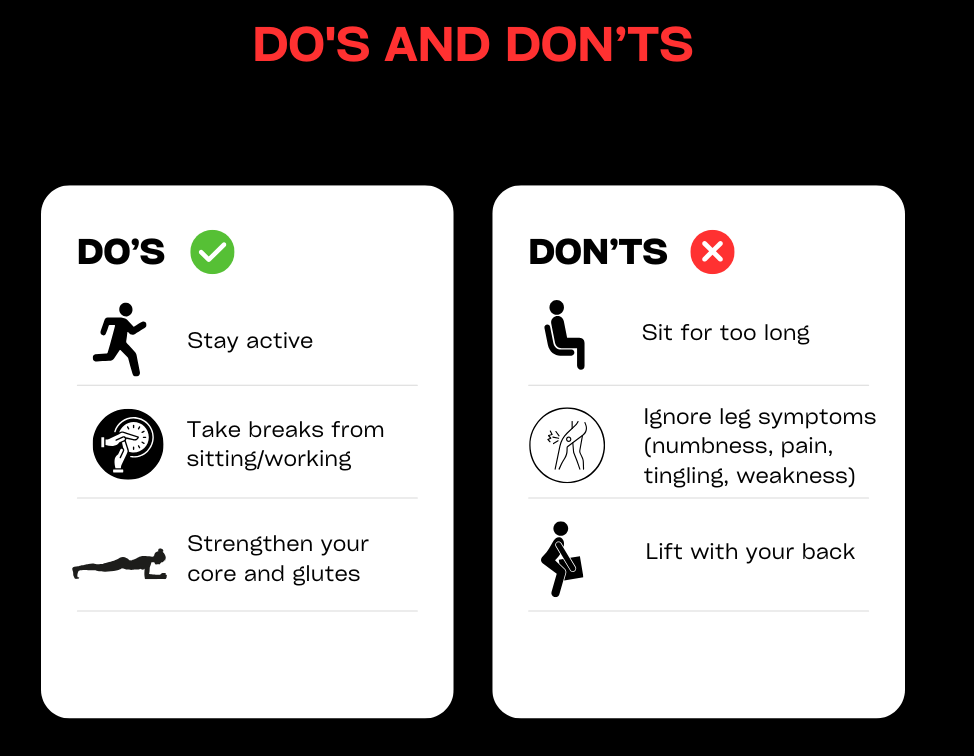
During a Flare-up: Aim for relative rest. Avoid provocative movements like deep bending and prolonged sitting. Use a heat pack for muscle ache or an ice pack for sharp, acute pain.
Gentle Movement is Key: Perform gentle mobility exercises like pelvic tilts and single knee-to-chest hugs. Try short, frequent walks on flat ground as tolerated. A gentle piriformis stretch can also be helpful.
Take Posture Breaks: Use the 20-8-2 rule at your desk: for every 20 minutes of sitting, stand for 8 and move for 2.
Learn to Hinge: Practise bending from your hips while keeping a neutral spine for tasks like loading the dishwasher or picking things up.
Optimise Your Sleep: Try sleeping on your side with a pillow between your knees or on your back with a pillow under your knees to support your spine.
Build a Routine: Incorporate regular walking and a simple strengthening programme for your core, hips, and glutes 2–3 times per week to build resilience.
Manage Stress & Sleep: Prioritise good sleep hygiene and use stress management techniques, as these have a direct impact on pain.
7. WHEN TO SEE A PHYSIO OR SPECIALIST
If you feel in doubt about your diagnosis or your lower back problem is not resolving book a physiotherapy assessment with one of our physiotherapists.
In the UK, up to 80% of people will experience back pain during their lifetime (NICE.org.uk). This equates to almost £5bn per annum through missed days of work, reduced hours or decreased productivity (britishpainsociety.org). Back pain can be split into several sub-categories – from disc related pain, mechanical (or muscle and joint) pain, neurogenic (nerve) pain, and metastatic (cancer) pain. At W5Physio, we’ll quickly diagnose your back pain before tailoring treatment to your specific needs. You don’t need to live with lower back pain. Get in touch with us today.
Metatarsal (MTP) injuries
1. DEFINITION & ANATOMY
The forefoot is a complex area responsible for absorbing shock and propelling you forward. It contains five long bones called metatarsals, which connect your midfoot to your toes at the metatarsophalangeal (MTP) joints—commonly known as the ball of your foot. Supporting these joints are crucial structures like the tough plantar plate ligaments underneath, collateral ligaments on the sides, and small intrinsic foot muscles. Under the first MTP joint (the big toe) are two small, pea-sized sesamoid bones that act like pulleys for the tendons. The entire system relies on the powerful calf complex for control and power.
Forefoot pain can arise from several issues, including:
- Acute Fractures: A break in a metatarsal bone, usually from direct trauma.
- Stress Fractures: A small crack in the bone caused by repetitive overuse and overload.
- Metatarsalgia: A general term for pain and inflammation in the ball of the foot.
- Plantar Plate Sprain/Tear: Injury to the thick ligament under an MTP joint, often causing the toe to sit slightly elevated.
- Turf Toe: A sprain of the first MTP joint caused by hyperextension of the big toe.
- Capsulitis: Inflammation of the joint capsule surrounding an MTP joint.
- Morton’s Neuroma: While not a true metatarsal injury, this thickening of nerve tissue between the metatarsals can cause similar symptoms and must be differentiated.
2. SYMPTOMS & SIGNS
- Localised pain under the ball of the foot or along the shaft of one of the metatarsal bones.
- Swelling and bruising, especially after an acute injury like a stamp on the foot.
- Sharp pain during the push-off phase of walking, running, or sprinting.
- A general ache that develops after prolonged walking or standing.
- Stiffness in the MTP joints, particularly in the morning.
- Pain that is noticeably worse in narrow-toed or high-heeled shoes.
- Tenderness when you press on a specific metatarsal head or along the bone’s shaft.
- Pain when the forefoot is squeezed from side to side.
- Reduced ability to perform a single-leg calf raise due to pain.
- An altered or limping (antalgic) gait to avoid putting pressure on the forefoot.
- Pain when hopping on the affected foot.
- Stress fracture red flags: Pin-point tenderness on the bone, pain at night, and pain that worsens over time, even with rest.
3. CAUSES & RISK FACTORS
- Direct Trauma: A sudden blow, such as dropping something on the foot or a misstep off a curb.
- Sudden Spikes in Training: Rapidly increasing running distance, intensity, or frequency.
- Changes in Surface or Footwear: Switching from soft to hard running surfaces or wearing new or unsupportive shoes.
- Biomechanical Factors: Foot shapes or movement patterns like overpronation (flat feet), over-supination (high arches), or having a second toe that is longer than the big toe.
- Weak Muscles: Poor strength or endurance in the small intrinsic foot muscles and the larger calf muscles.
- Limited Ankle Mobility: Restricted ankle dorsiflexion (bending the ankle up) can force the forefoot to take more load.
- Hallux Rigidus: A stiff big toe joint that alters push-off mechanics.
- Inappropriate Footwear: Regularly wearing high-heeled or narrow, pointed shoes that compress the forefoot.
- Low Energy Availability / RED-S: Inadequate nutrition can compromise bone health.
- Vitamin D Deficiency: Important for bone density and health.
- Occupations: Jobs that require prolonged standing or walking on hard surfaces.
4. HOW PHYSIOTHERAPY HELPS
- Assessment: We start with a detailed history to understand your training loads and screen for stress fracture red flags. A physical examination will include palpation, special tests (like the tuning fork, hop, or fulcrum tests), and a thorough gait and footwear analysis. If a fracture or neuroma is suspected, we can help facilitate a referral for imaging.
- Manual Therapy: We use hands-on techniques to improve MTP joint mobility and perform soft-tissue release for tight structures like the plantar fascia, calf muscles, and peroneals to unload the forefoot. Taping can also be used to offload an irritated plantar plate or sesamoid bones.
- Exercise Therapy: You will receive a carefully graded loading programme. This begins with strengthening the intrinsic foot muscles (e.g., short-foot exercises, toe yoga) and progresses to building endurance in the calf complex. We will also address foot and ankle mobility and restore your balance. For runners, we will guide you through a specific return-to-running plan using hopping and plyometric progressions.
- Education & Habit Change: We will teach you the difference between relative rest and complete rest, and help you manage your training loads to prevent recurrence. We provide expert advice on footwear, recommending shoes with a roomy toe box, adequate cushioning, or rocker soles. We can also advise on in-shoe padding or off-the-shelf orthoses where appropriate.
- Adjuncts: We provide guidance on using ice or heat, and may recommend temporary use of a stiff carbon plate or steel shank insert for conditions like turf toe to limit painful movement. If a vitamin D deficiency or significant fracture is suspected, we will liaise with your GP.
5. TIMELINE / EXPECTED RECOVERY
- Plantar Plate Sprains/Capsulitis: These soft tissue injuries can take 4–8 weeks, or longer, to fully settle, depending on their severity and how well load is managed.
- Bone Stress Injuries: Uncomplicated stress reactions often improve within 6–8 weeks. Confirmed stress fractures typically require 6–12 weeks or more to heal, depending on the location and severity.
- Acute Fractures: Recovery will follow the timelines set by your orthopaedic consultant, which often involves a period of immobilisation in a boot.
- Early intervention is key. Symptoms almost always improve faster when aggravating loads are identified and managed early in the process.
6. SELF-HELP & PREVENTION
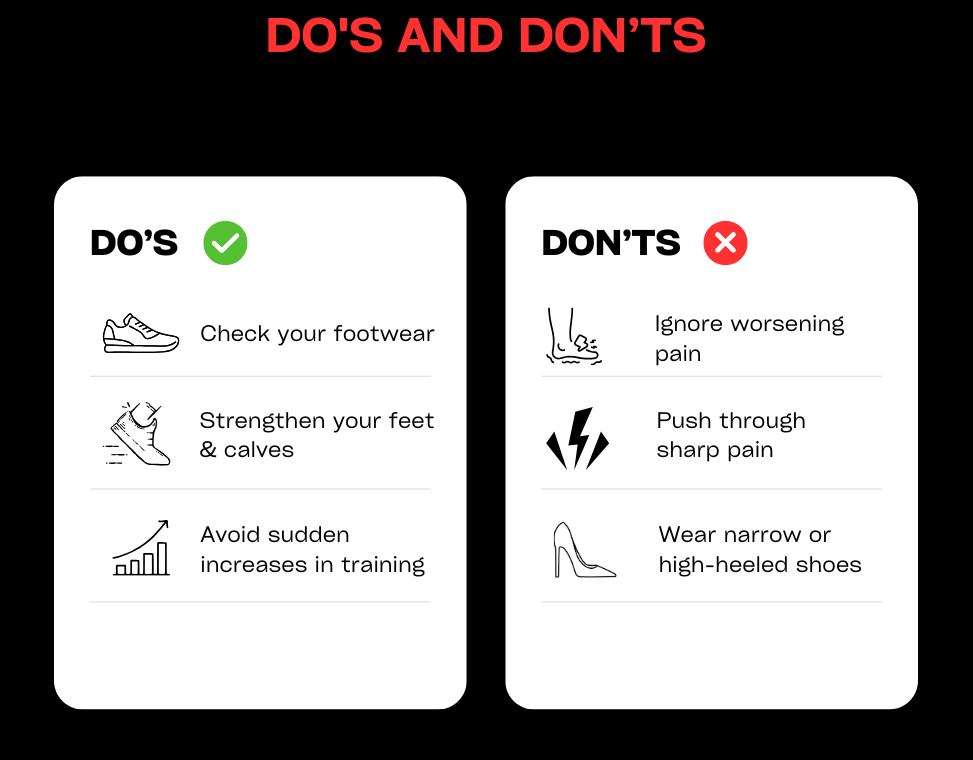
- During a Flare-up: Reduce high-impact activities like running and switch to cross-training like cycling or swimming. Avoid hills and sprinting. Consider using an over-the-counter metatarsal pad or a more cushioned insole. Apply ice for 10–15 minutes after activity to manage pain and swelling.
- Gentle Movement: Perform pain-free big toe mobility exercises and gentle intrinsic muscle activation (like trying to dome the arch of your foot).
- Build a Routine: When returning to running, use a gradual walk-jog progression. Focus on strengthening your calves and intrinsic foot muscles 2–3 times per week. Rotate your shoes regularly and check that the midsole cushioning hasn’t worn out.
7. WHEN TO SEE A PHYSIO OR SPECIALIST
If you feel in doubt about your diagnosis or your metatarsal problem is not resolving book a physiotherapy assessment with one of our physiotherapists.
Book your slot today to find out more.
Mid back pain (thoracic)
1. DEFINITION & ANATOMY
Mid-back pain, also known as thoracic pain, refers to any discomfort felt in the region of your thoracic spine. This section of your spine runs from the base of your neck to the bottom of your ribs and is made up of twelve vertebrae (T1–T12). Unlike the more mobile neck and lower back, the thoracic spine is designed for stability, forming the anchor for your rib cage. Each rib connects to the spine at two points (the costovertebral and costotransverse joints), creating a strong, protective structure for your internal organs.
Key muscles in this area include the mid and lower trapezius, rhomboids, erector spinae, and serratus anterior, all of which control shoulder blade movement and posture. Breathing mechanics also heavily influence this area via the intercostal muscles between the ribs.
Common causes of mid-back pain include:
- Mechanical or Postural Pain: The most frequent type, arising from muscle fatigue or joint strain due to prolonged postures.
- Joint & Rib Dysfunction: Stiffness or irritation in the facet joints or where the ribs meet the spine, often causing sharp, localised pain.
- Myofascial Pain: Trigger points or knots in the muscles between the shoulder blades.
- Referred Pain: Pain that originates in the neck or shoulder but is felt in the mid-back.
- Less common issues include disc herniation (rarer than in the neck or low back), osteoarthritis, and osteoporosis-related compression fractures.
2. SYMPTOMS & SIGNS
- A persistent dull ache or feeling of stiffness between the shoulder blades.
- A sharp, catching pain with certain movements like twisting or taking a deep breath.
- Pain that worsens after prolonged sitting, especially at a desk or while driving.
- Symptoms that are aggravated by slouching with a forward head posture but feel better with movement or standing tall.
- Rib-related pain that can feel like it is wrapping around the side of your chest.
- Pain that is triggered by coughing, sneezing, or deep breathing.
- Noticeable muscular knots or tender spots along the spine or in the rhomboid muscles.
- Limited ability to rotate or extend your upper body.
- Pain when working with your arms overhead.
- Red Flags (requiring medical review): Chest pain or shortness of breath, constant night pain, fever, unexplained weight loss, or new, severe pain following trauma or in an older adult.
3. CAUSES & RISK FACTORS
- Prolonged Static Postures: Long hours spent sitting at a computer, driving, or looking down at a phone.
- Deconditioning: Weakness in the postural muscles of the upper back and core.
- Poor Workstation Ergonomics: A desk, chair, or screen setup that encourages slouching.
- Repetitive Overhead Tasks: Activities like painting, construction work, or certain sports (e.g., swimming, tennis).
- Heavy Lifting with Poor Technique: Using your back instead of your legs, or twisting while lifting.
- Stress and Shallow Breathing: Emotional tension often leads to muscle guarding and a tense, upper-chest breathing pattern.
- Structural Factors: Pre-existing conditions like scoliosis (curvature of the spine) or an excessive kyphosis (hunchback posture).
- Osteoporosis: Reduced bone density, which increases the risk of compression fractures.
- Rotational Sports: Activities like golf, rowing, or racquet sports that place high demand on the thoracic spine.
- Muscle Imbalances: Commonly, tight chest (pectoral) muscles combined with weak mid-back muscles.
- Carrying a heavy bag consistently on one shoulder.
4. HOW PHYSIOTHERAPY HELPS
- Assessment: We conduct a comprehensive assessment to screen for any red flags and identify the source of your pain. This includes analysing your posture, breathing patterns, thoracic spine and rib mobility, and scapular control, as well as checking for contributions from your neck and shoulders.
- Manual Therapy: We use hands-on techniques including thoracic spine and rib mobilisations (and manipulation where appropriate) to restore movement. This is often combined with soft-tissue release for tight muscles like the paraspinals, rhomboids, and upper traps.
- Exercise Therapy: You will receive a graded exercise plan focused on improving mobility and building strength. This includes mobility drills like ‘open books’, ‘thread-the-needle’, and thoracic extensions over a foam roller. We will then build strength in your key postural muscles (mid/lower traps, rhomboids, serratus anterior) and integrate these improvements into functional movements like rowing and lifting. We also address breathing mechanics, teaching diaphragmatic breathing to reduce strain.
- Education & Habit Change: Understanding how to manage your posture and activities is crucial. We provide advice on taking micro-breaks (like the 20-8-2 rule), setting up your workstation ergonomically (e.g., using a laptop riser), managing loads during overhead work, and finding better sleeping positions.
- Adjuncts: We may use taping to provide postural feedback or short-term relief, alongside guidance on using heat. If an underlying issue like osteoporosis is suspected, we will coordinate with your GP for further assessment.
5. TIMELINE / EXPECTED RECOVERY
- Mechanical/Postural Pain: Most cases of simple postural strain respond well to physiotherapy, with significant improvement typically seen within 2–6 weeks.
- Acute Rib Dysfunction: Sharp rib-related pain often settles relatively quickly, usually within 2–4 weeks, once mobility is restored.
- Chronic or Deconditioned Patterns: If pain is long-standing and linked to significant weakness, it may take 6–12 weeks to build the necessary strength and endurance for lasting relief.
- Flare-ups can occur, especially with postural pain, but physiotherapy will equip you with the self-management tools to control them quickly.
6. SELF-HELP & PREVENTION
- During a Flare-up: Avoid prolonged slouching and heavy overhead lifting. A heat pack applied between the shoulder blades can help ease muscle tension.
- Gentle Mobility: Perform gentle movements like thoracic extensions over a rolled-up towel or foam roller, ‘open book’ stretches, and simple shoulder blade squeezes (scapular retractions).
- Stay Active: Short, regular walks and focusing on deep, relaxed breathing can help reduce stiffness and tension.
- Build a Routine: To prevent recurrence, incorporate a simple strengthening programme 2–3 times per week with exercises like rows, Ys, and Ts.
- Check Your Workstation: Ensure your monitor is at eye level, your elbows are supported, and you take regular breaks to stand and move.
- Stretch your Pecs: Regularly perform a doorway chest stretch to counteract the effects of slouching.
7. WHEN TO SEE A PHYSIO OR SPECIALIST
If you feel in doubt about your diagnosis or your mid back problem is not resolving book a physiotherapy assessment with one of our physiotherapists.
Don’t suffer in silence… come and get some professional advice and relief from one of our experienced physios.
Neck pain
1. DEFINITION & ANATOMY
Neck pain is an incredibly common issue, stemming from the complex and mobile structure of your cervical spine. Your neck is composed of seven vertebrae (C1–C7), separated by shock-absorbing intervertebral discs and guided by small facet joints. A network of ligaments provides stability, while key muscles—like the deep neck flexors in the front, scalenes at the side, and the upper trapezius, levator scapulae, and suboccipitals at the back—control movement and support your head. Nerve roots exit from the spine at each level to supply your shoulders, arms, and hands. Posture and stress levels have a significant influence on the health of this entire system.
Common categories of neck pain include:
- Non-Specific or Mechanical Neck Pain: The most frequent type, involving general ache and stiffness from muscular strain or joint irritation without a specific structural cause.
- Whiplash-Associated Disorders (WAD): An injury caused by a rapid back-and-forth movement of the head, often from a car accident.
- Cervical Spondylosis: Age-related wear and tear or arthritis in the joints and discs of the neck.
- Acute Torticollis: A sudden, painful spasm of the neck muscles that causes the head to be stuck tilted to one side, often noticed upon waking.
- Cervical Radiculopathy: Irritation or compression of a nerve root as it leaves the spine, causing pain, tingling, or weakness to radiate into the arm.
- Cervicogenic Headache: Headaches that originate from a problem within the neck joints or muscles.
2. SYMPTOMS & SIGNS
- A persistent dull ache or stiffness localised to the neck.
- A sharp, catching pain when turning your head.
- Reduced range of motion, especially with rotation (looking over your shoulder) or side-bending (tilting your ear to your shoulder).
- Morning stiffness that eases with gentle movement.
- Pain that worsens after prolonged desk work, driving, or looking down at your phone.
- Noticeable muscle spasm or tightness, particularly in the upper shoulders (trapezius).
- Pain that refers down into the shoulder blade or upper back.
- Headaches, especially at the base of the skull or wrapping around to the temples.
- Arm symptoms such as tingling, pins and needles, numbness, or weakness (indicative of nerve irritation).
- Pain that is aggravated by poor pillow support during sleep.
- Relief with gentle movement, stretching, or applying a heat pack.
3. CAUSES & RISK FACTORS
- Prolonged Sitting & Screen Time: Sustained postures, especially with a forward head position, overload neck structures.
- Poor Ergonomics: A workstation or driving setup that encourages slouching.
- Previous Neck Injury: A history of trauma, such as whiplash, can predispose you to future episodes.
- Deconditioning: Weakness in the deep neck flexor muscles and the muscles around your shoulder blades.
- Stress, Anxiety, and Poor Sleep: These factors increase muscle tension and pain sensitivity.
- Age-Related Changes: Degenerative processes (spondylosis) are a normal part of ageing but can sometimes become symptomatic.
- Contact Sports or High-Impact Activities.
- Generalised Joint Hypermobility.
- High Phone Use: The classic “text neck” posture places significant strain on the cervical spine.
4. HOW PHYSIOTHERAPY HELPS
- Assessment: We perform a thorough assessment to screen for any red flags and classify the source of your pain. This includes checking your range of motion, joint mobility, and muscle performance, including the endurance of your deep neck flexors (DNFs) and scapular control. If you have arm symptoms, a neurological screen is essential. We will liaise with your GP if imaging is required.
- Manual Therapy: We use hands-on techniques such as cervical and thoracic spine mobilisations (or manipulation where appropriate) to restore joint movement. This is complemented by soft-tissue release for tight and tender muscles like the upper trapezius, levator scapulae, scalenes, and suboccipitals.
- Exercise Therapy: You will receive a graded exercise programme tailored to your needs. This often starts with activating the deep neck flexors and strengthening the key scapular muscles (mid/lower traps, serratus anterior). We will also prescribe mobility drills and, if appropriate, gentle nerve gliding exercises for radicular symptoms. The overall goal is to build postural endurance and resilience.
- Education & Habit Change: A crucial part of recovery is learning to manage your condition. We provide education on pain science, activity pacing, and the importance of posture breaks (using the 20-8-2 rule). We offer specific advice on workstation setup, pillow selection, sleep positions, and phone ergonomics. We can also provide strategies for stress management and breathing.
- Adjuncts: We may use taping for postural feedback or short-term relief, and provide guidance on using heat or ice. If needed, we will coordinate with your GP regarding pain medication or referral to a specialist.
5. TIMELINE / EXPECTED RECOVERY
- Mechanical Neck Pain: Most acute episodes of simple neck strain or stiffness respond well to physiotherapy, with significant improvement within 2–6 weeks.
- Whiplash-Associated Disorders: Recovery can be more variable but typically takes between 6–12 weeks. An active, graded approach is key.
- Radicular Symptoms: Nerve-related pain can take longer to settle, often requiring 6–12 weeks or more for the nerve to calm down and for strength to be restored.
- Cervical Spondylosis: As this is a chronic condition, management focuses on strengthening, maintaining mobility, and developing strategies to control flare-ups effectively.
- Flare-ups are common with neck pain, but physiotherapy empowers you with self-management skills to control them faster.
6. SELF-HELP & PREVENTION
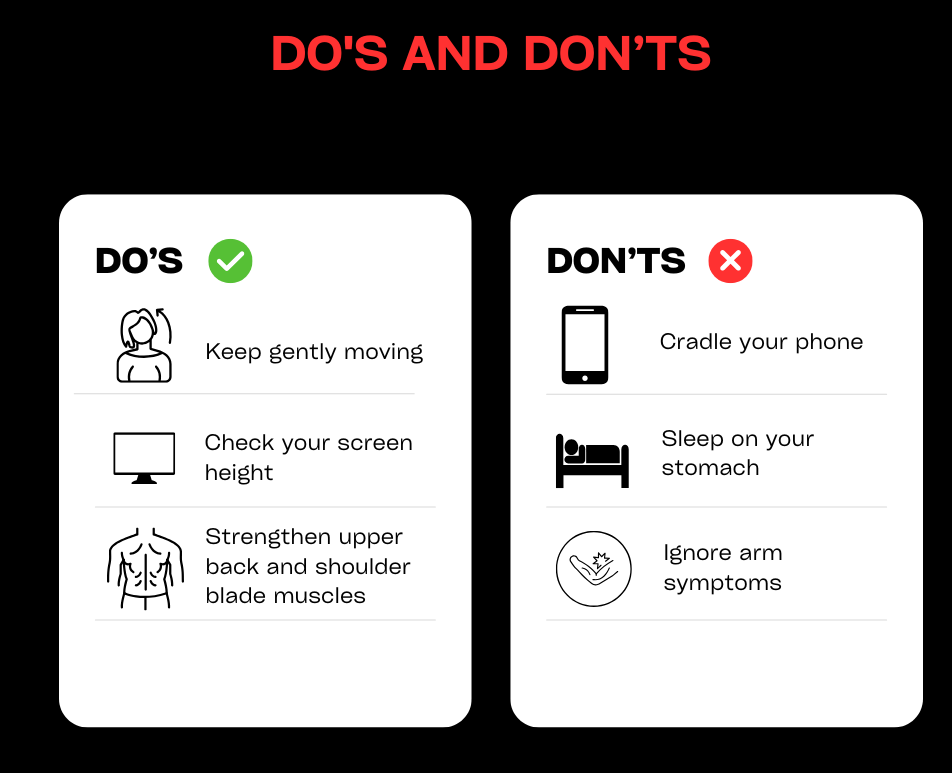
- During a Flare-up: Aim for relative rest but avoid complete immobility. Avoid sustained end-range postures (e.g., looking down for long periods). Perform gentle range of motion exercises like chin tucks and slow head rotations. A heat pack can be very effective for muscular pain.
- Take Micro-Breaks: Get up and move frequently. Short walks and gentle stretches can prevent stiffness from setting in.
- Build a Routine: Incorporate a simple strengthening programme for your neck and scapular muscles 2–3 times per week. Daily mobility drills can also help maintain flexibility.
- Optimise Your Ergonomics: Use a headset for long phone calls. Raise your laptop or monitor screen to eye level. Ensure your pillow supports your neck in a neutral position.
7. WHEN TO SEE A PHYSIO OR SPECIALIST
If you feel in doubt about your diagnosis or your neck problem is not resolving book a physiotherapy assessment with one of our physiotherapists.
Get moving and reduce pain quickly. Book an appointment with one of our physios.
Posterior ankle pain / heel pain / fat pad
Posterior Ankle Pain / Heel Pain / Fat Pad
1. DEFINITION & ANATOMY
Pain at the back of the ankle and heel can arise from several different structures. The anatomy in this area is complex, involving the large calcaneus (heel bone) which acts as the attachment point for the powerful Achilles tendon. Between the tendon and bone sits the retrocalcaneal bursa, a small fluid-filled sac that reduces friction, with another bursa (superficial calcaneal) located between the tendon and the skin. Kager’s fat pad sits just in front of the Achilles, while the plantar fat pad provides crucial cushioning directly under the heel bone. Deeper within the ankle, the posaterior part of the talus bone and tendons like the tibialis posterior and flexor hallucis longus (FHL) can also be sources of pain.
Common conditions we treat include:
- Achilles Tendinopathy: Irritation and degeneration of the Achilles tendon, either in its mid-portion (2-6cm above the heel) or at its insertion point on the heel bone (insertional).
- Retrocalcaneal Bursitis: Inflammation of the bursa located between the Achilles tendon and the heel bone.
- Haglund’s Deformity: A bony enlargement on the back of the heel bone that can irritate the bursa and Achilles tendon.
- Heel Fat Pad Irritation: Bruising or irritation of the shock-absorbing fat pad under the heel, which must be differentiated from plantar fasciitis.
- Posterior Ankle Impingement: When soft tissues or a small extra bone (Os Trigonum) get pinched at the back of the ankle joint during pointing of the foot.
- FHL or Tibialis Posterior Tendinopathy: Irritation of tendons that run deep behind the ankle, common in dancers, runners, or people with flat feet.
2. SYMPTOMS & SIGNS
- Pain Location: Can be specific to the back of the heel (insertional/bursitis), higher up the tendon (mid-portion), deep inside the ankle when pointing the toes (impingement), or directly under the centre of the heel (fat pad).
- Morning Stiffness: Significant pain and stiffness upon taking the first few steps in the morning, which often eases as you warm up.
- Warm-up Effect: Pain that lessens during the initial part of an activity but returns afterwards, often worse the next day.
- Swelling or Thickening: A noticeable lump or thickening in the mid-portion of the Achilles tendon or swelling around the insertion.
- Pain with Activity: Symptoms are typically aggravated by uphill running, sprinting, jumping, or pointing the toes.
- Pain on Heel Strike: A deep, bruise-like pain directly under the heel when walking, characteristic of fat pad irritation.
- Crepitus or Snapping: A clicking or snapping sensation at the back of the ankle, sometimes associated with FHL tendinopathy.
- Red Flags: Following a trauma (like a forced pointing of the foot), persistent deep posterior pain could indicate a fracture of the posterior talar process.
3. CAUSES & RISK FACTORS
- Sudden Spikes in Training: Rapidly increasing running distance, speed, or introducing hill repetitions.
- Biomechanical Factors: Tight calf muscles, limited ankle dorsiflexion (bending the ankle up), overpronation (flat feet) which loads the tibialis posterior, or high-arched (cavus) feet.
- Poor Footwear: Shoes with a rigid, rubbing heel counter can irritate the bursa and Achilles insertion. Switching abruptly from high heels to flat shoes can also overload the tendon.
- Haglund’s Deformity: A pre-existing bony prominence on the heel.
- Hard Surfaces: Regularly running or walking on unforgiving surfaces.
- Previous Ankle Sprain: An old injury can alter mechanics and increase load on surrounding structures.
- Specific Sports: Activities requiring repeated pointing of the foot and ankle, such as ballet, gymnastics, or football (kicking).
- Systemic Factors: Certain medical conditions or medications (like fluoroquinolone antibiotics) can increase the risk of tendon problems.
4. HOW PHYSIOTHERAPY HELPS
- Assessment: We start with a detailed history to identify changes in your training load. A physical examination will involve mapping the precise location of your pain through palpation, assessing calf flexibility, ankle range of motion, and testing your strength with tasks like single-leg heel raises and hopping. We will differentiate between fat pad pain and plantar fasciitis and assess the function of tendons like tibialis posterior and FHL. We also analyse your footwear. If a fracture is suspected, we can refer you for imaging.
- Manual Therapy: We use hands-on techniques like ankle and subtalar joint mobilisations and soft-tissue release for the calf, Achilles, and other tight structures. We may also use taping to offload the fat pad or Achilles tendon.
- Exercise Therapy: This is the cornerstone of recovery. You will receive a graded loading programme, often starting with isometric holds for pain relief. This progresses to specific calf raise variations (both bent and straight knee) and, for insertional issues, modifications to avoid painful end-range positions initially. We also target other relevant muscles (e.g., tibialis posterior, foot intrinsics) and guide you through a safe return to running and sport with plyometric drills.
- Education & Habit Change: We will teach you how to manage your activity levels to allow for healing. We’ll provide advice on avoiding direct compression on the tendon, modifying footwear (e.g., finding shoes with a softer heel counter or using a small heel lift), and using ice or heat appropriately.
- Adjuncts: For chronic tendinopathies, shockwave therapy can be an effective treatment option. We can also advise on orthoses for issues like tibialis posterior dysfunction and liaise with your GP regarding imaging or medication.
5. TIMELINE / EXPECTED RECOVERY
- Mid-Portion Achilles Tendinopathy: These often require a consistent loading programme over 8–12 weeks or more.
- Insertional Achilles Tendinopathy: Can be more stubborn and often takes 12+ weeks to resolve fully.
- Bursitis & Fat Pad Irritation: With appropriate load management and footwear changes, these can settle within 2–6 weeks.
- Posterior Impingement: Conservative management can be effective over 4–8 weeks, though some persistent cases may require specialist surgical review.
- FHL/Tibialis Posterior Tendinopathy: Typically requires a 6–12 week progressive strengthening programme.
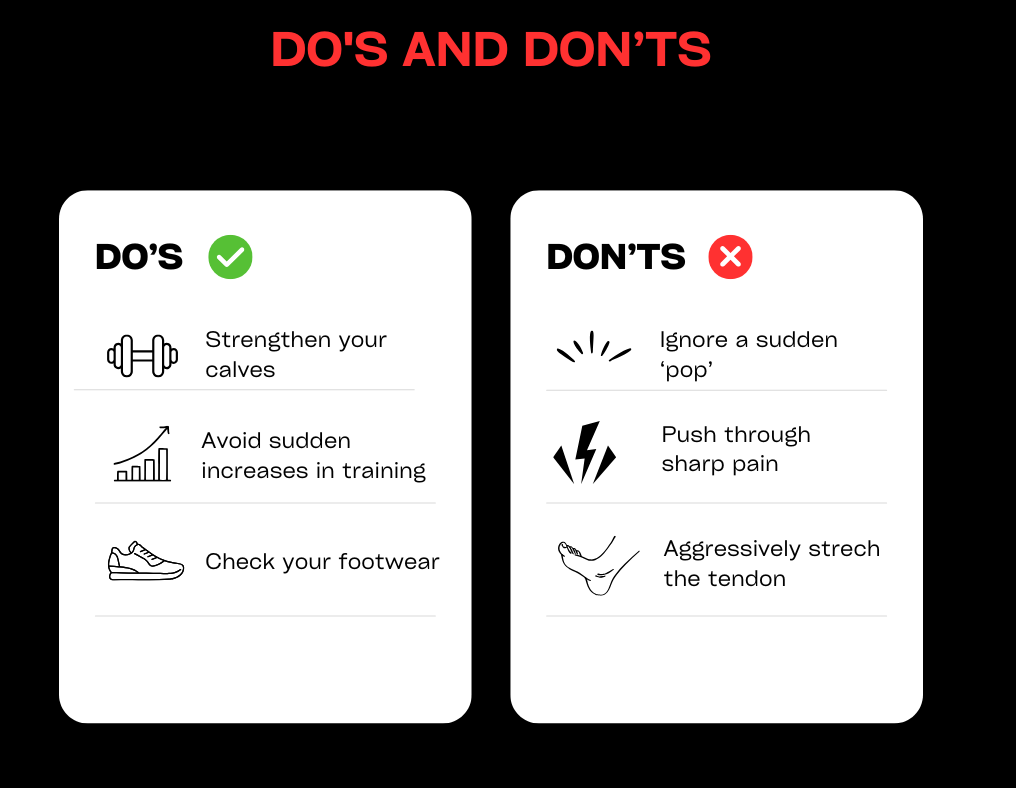
6. SELF-HELP & PREVENTION
- During a Flare-up: Reduce or stop aggravating activities like hill running and sprinting. Avoid shoes with a hard, rigid heel counter. A gel heel cup or temporary heel lift can provide short-term relief. Apply ice for 15 minutes after activity.
- Gentle Movement: Perform gentle calf mobility exercises and pain-free isometric heel raises (e.g., holding a calf raise position for 30-45 seconds).
- Build a Routine: As symptoms settle, gradually reintroduce walk-run intervals. To prevent recurrence, incorporate calf strengthening 2–3 times per week, work on your balance, and rotate your footwear regularly.
7. WHEN TO SEE A PHYSIO OR SPECIALIST
If you feel in doubt about your diagnosis or your posterior ankle problem is not resolving book a physiotherapy assessment with one of our physiotherapists.
Book an appointment today for expert advice on ankle pain.
Posterior knee pain
1. DEFINITION & ANATOMY
Posterior knee pain refers to any discomfort felt at the back of the knee, in an area known as the popliteal fossa. This is a busy anatomical region where the thigh bone (femur) meets the shin bone (tibia). It is stabilised by ligaments like the Posterior Cruciate Ligament (PCL) and contains the back portions (posterior horns) of the shock-absorbing menisci.
Many important structures run through or attach here, including the hamstring muscles (semimembranosus, biceps femoris), the calf muscles (gastrocnemius), and the smaller popliteus and plantaris muscles. These are surrounded by bursae (fluid-filled sacs) that reduce friction, most notably the one that can swell to form a Baker’s Cyst. Crucial arteries, veins, and nerves also pass through this space. Pain can also be referred to the back of the knee from the lower back or hip.
2. SYMPTOMS & SIGNS
- A dull ache or sharp pain located at the back of the knee.
- Stiffness after periods of sitting, which improves with movement.
- Pain that is triggered by deep knee bends, walking down stairs, running (especially uphill), or pushing off.
- Tenderness when pressing on the hamstring or calf muscle insertions, or deep within the back of the knee.
- A feeling of fullness, swelling, or a palpable lump behind the knee (often a Baker’s Cyst).
- Catching, clicking, or a feeling of instability.
- Difficulty fully straightening the knee (reduced terminal extension).
- Pain when resisting a knee bend (resisted flexion) or performing a calf raise.
- Pain when stretching the hamstring muscles.
- Red Flags: Sudden, significant calf swelling, redness, and warmth (suspicion of a DVT, which requires immediate medical attention); severe pain and swelling after trauma with an inability to bear weight; or true locking of the knee.
3. CAUSES & RISK FACTORS
- Overuse: Sudden increases in running distance, introducing hill work, or a spike in training load.
- Hamstring or Calf Tendinopathy: Irritation of the tendons where they attach at the back of the knee.
- Popliteus Strain: Injury to the small muscle that helps “unlock” the knee from a straight position.
- Meniscal Tears: A tear in the posterior horn of the meniscus can refer pain to the back of the knee.
- PCL Sprain: Injury to the Posterior Cruciate Ligament, often from a direct blow to the front of the shin (a “dashboard injury”) or from hyperflexion of the knee.
- Baker’s Cyst: Swelling of a bursa at the back of the knee, which is almost always a secondary sign of an underlying issue within the knee joint, such as arthritis or a meniscal tear.
- Biomechanical Factors: Poor hip and gluteal strength, limited ankle flexibility, or running with an over-striding gait.
- Previous Knee Injury: An old injury can alter mechanics and overload posterior structures.
- Occupations: Jobs that involve repetitive kneeling or squatting.
- Age-related degeneration (osteoarthritis) or inflammatory conditions.
4. HOW PHYSIOTHERAPY HELPS
- Assessment: We conduct a thorough assessment to determine the source of your pain. This includes a detailed history, specific palpation, and clinical tests for the ligaments (e.g., Posterior Drawer test for the PCL) and menisci (e.g., McMurray’s test). We will assess your muscle strength, joint range of motion, balance, and analyse your gait or running pattern. Crucially, we will screen for any red flags and can liaise with your GP for imaging if necessary.
- Manual Therapy: We use hands-on techniques like knee joint mobilisations to improve movement, and soft-tissue release for tight hamstrings, calf muscles, or the popliteus. In some cases, gentle neural mobilisations can help if nerve tension is a factor.
- Exercise Therapy: You will receive a graded exercise programme tailored to your specific diagnosis. This may include isometric exercises for pain relief, progressing to a loading plan for the hamstrings and calves (e.g., bridges, eccentric exercises, Nordic curls). We will also focus on strengthening the quadriceps and improving hip/gluteal control and ankle mobility. Restoring full knee extension and a progressive return-to-sport plan are key components.
- Education & Habit Change: Understanding how to manage your activities is vital. We provide education on load management, the importance of gradual progression, correct warm-up and cool-down procedures, and footwear advice. For runners, we can provide cues to adjust cadence to reduce over-striding.
- Adjuncts: We may use taping or a brace for short-term support, and provide guidance on using heat or ice. For large, symptomatic Baker’s Cysts, we can advise on management options and liaise with your GP.
5. TIMELINE / EXPECTED RECOVERY
- Mild Muscular or Tendinous Strains: These often respond well to physiotherapy within 2–6 weeks.
- Hamstring or Calf Tendinopathy: These can be more persistent and may require a dedicated loading programme for 6–12 weeks or more.
- Meniscal Irritation: Recovery is variable, but a 6–12 week period of targeted rehabilitation can often be very effective.
- PCL Sprains (Grade I-II): These ligament injuries typically require a structured rehabilitation plan over 6–12 weeks to restore stability and strength.
- Baker’s Cyst: The cyst itself will resolve once the underlying cause within the knee is successfully treated.
6. SELF-HELP & PREVENTION
- During a Flare-up: Modify your activity. Reduce hill work and deep squats, and switch to lower-impact activities like cycling on the flat or swimming. Apply ice for 10–15 minutes to manage pain and swelling.
- Gentle Movement: Perform pain-free range of motion exercises like heel slides. Gentle isometric holds for your quads, hamstrings, and calves can help maintain muscle activation without aggravating the knee.
- Build a Routine: To prevent recurrence, incorporate a regular strengthening programme for your hips, glutes, and hamstrings 2–3 times per week. Maintain good mobility in your hips and ankles. When returning to running, do so gradually.
7. WHEN TO SEE A PHYSIO OR SPECIALIST
If you feel in doubt about your diagnosis or your posterior knee problem is not resolving book a physiotherapy assessment with one of our physiotherapists.
Knee pain is one of the most common complaints we help in clinic. Book to see us today.
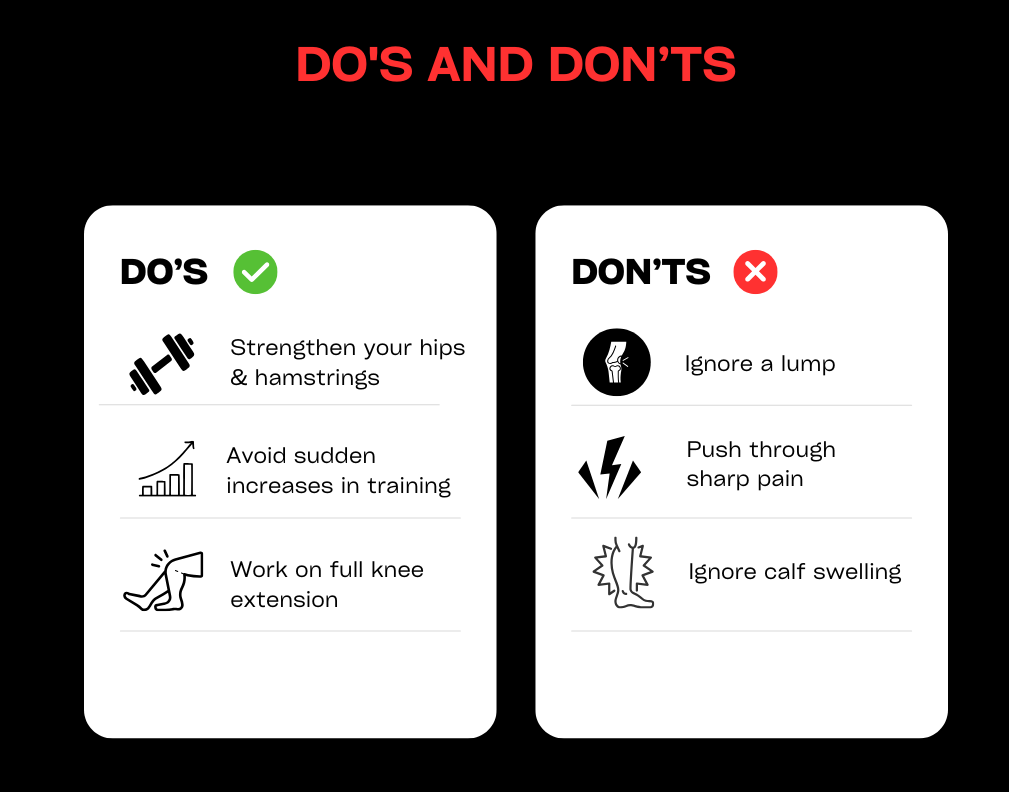
Shin Splints (Medial Tibial Stress Syndrome)
1. DEFINITION & ANATOMY
Shin splints, known clinically as Medial Tibial Stress Syndrome (MTSS), is an overuse injury characterised by exercise-induced pain along the inner border of the shin bone (tibia). It’s not an injury to a single muscle, but rather a stress reaction at the interface where muscles and fascia attach to the bone’s sensitive outer layer, the periosteum.
Key structures involved include the tibia itself, and the deep posterior compartment muscles that run alongside it, such as the tibialis posterior, soleus, and flexor digitorum longus. The entire calf complex and the small intrinsic muscles of the foot also play a crucial role in absorbing load. MTSS is essentially a bone-loading injury, representing a point on a spectrum that, if ignored, can progress to a more serious tibial stress fracture. It’s important to differentiate it from a stress fracture (more localised pain) and Chronic Exertional Compartment Syndrome (CECS), which involves pressure build-up and neurological symptoms.
2. SYMPTOMS & SIGNS
- A gradual onset of a dull, aching pain along the inner, lower two-thirds of the shin bone, felt during and after exercise.
- Tenderness to touch over a broad area (usually more than 5cm) along the medial border of the tibia.
- Morning stiffness or pain with the first few steps of the day.
- A typical pain pattern during a run: pain may appear at the start, ease off as you warm up, then return with greater intensity later in the run or afterwards.
- Pain that is worse when running on hard surfaces or hills.
- You may feel lumpy or thickened areas along the bone where the pain is most intense.
- Pain when hopping on the affected leg.
- Stress Fracture Red Flags: Very localised, focal point tenderness (an area you can cover with one fingertip); pain that occurs at night or at rest; and a positive hop test that produces sharp, immediate pain.
- CECS Clues: Symptoms that include a feeling of intense tightness, cramping, tingling, or numbness that builds predictably during a run and resolves quickly with rest.
3. CAUSES & RISK FACTORS
- Rapid Training Spikes: The most common cause is doing “too much, too soon”—suddenly increasing running mileage, intensity, or introducing hill work.
- Changes in Surface or Footwear: Switching from soft to hard running surfaces or wearing worn-out or inappropriate shoes.
- Biomechanical Factors: Foot mechanics like overpronation (flat feet) or having very high, rigid arches (pes cavus).
- Muscle Imbalances: Tightness or weakness in the calf and soleus muscles, or poor strength in the hip abductor (gluteal) muscles.
- Running Gait: A low running cadence (fewer steps per minute) or over-striding can increase impact forces on the tibia.
- Limited Ankle Dorsiflexion: Restricted ability to bend the ankle upwards can alter running mechanics.
- Low Energy Availability / RED-S: Inadequate nutrition relative to training demands, which can compromise bone health.
- Vitamin D deficiency and low bone mineral density.
- A previous history of MTSS.
4. HOW PHYSIOTHERAPY HELPS
- Assessment: We perform a thorough assessment, starting with a detailed history of your training load. We will map the tender area via palpation and use tests like the hop test to help rule out a stress fracture. We assess calf and soleus strength and length, single-leg control, and perform a running gait analysis to identify factors like low step rate or foot crossover. If a stress fracture or CECS is suspected, we can facilitate a referral to your GP or a specialist.
- Manual Therapy: We may use soft-tissue techniques for the calf, soleus, and tibialis posterior muscles to reduce tension, along with gentle techniques to desensitise the tibial periosteum. Mobilisations for the ankle and foot can also help improve mechanics. Taping can be used to temporarily support the arch or offload the tibia.
- Exercise Therapy: This is the key to long-term success. We will create a graded loading programme starting with pain-free activity. This will include specific calf strengthening, with an emphasis on the soleus muscle (e.g., bent-knee calf raises), and progressing to heavy slow resistance. We will also address foot intrinsic strength, hip and gluteal control, and balance. As you improve, we will guide you through a structured return-to-run plan.
- Education & Habit Change: We will teach you crucial load management principles, such as the “10% rule” for safe training progression. You will receive guidance on footwear, the benefits of shoe rotation, and how to manage different running surfaces. We may recommend a temporary increase in your running cadence (steps per minute) by 5–10% to reduce impact forces.
- Adjuncts: We will provide advice on using ice post-run, shock-absorbing insoles, and can liaise with your GP regarding bone health concerns like Vitamin D levels if indicated.
5. TIMELINE / EXPECTED RECOVERY
- Mild MTSS: With prompt and effective load modification, symptoms often improve significantly within 3–6 weeks.
- Moderate Cases: These may require a more structured rehabilitation plan over 6–10 weeks.
- Severe or Recurrent Cases: Long-standing issues can take 10–12 weeks or longer to resolve, requiring consistent adherence to a strength and conditioning plan.
- Early management is crucial. The sooner you address the contributing factors, the faster your recovery will be.
6. SELF-HELP & PREVENTION
- During a Flare-up: Reduce or replace high-impact activity. Switch to cross-training like cycling, swimming, or using the elliptical. Avoid running on hills or heavily cambered roads.
- Symptom Management: Apply ice for 10–15 minutes after activity. Gentle calf and soleus stretches may be helpful if they are pain-free. Compression sleeves can sometimes provide symptomatic relief.
- Build a Routine: To prevent recurrence, build a consistent strengthening routine for your calves, soleus, hips, and glutes 2–3 times per week. When you return to running, do so gradually and pay attention to your cadence.
7. WHEN TO SEE A PHYSIO OR SPECIALIST
If you feel in doubt about your diagnosis or your shin splint problem is not resolving book a physiotherapy assessment with one of our physiotherapists.
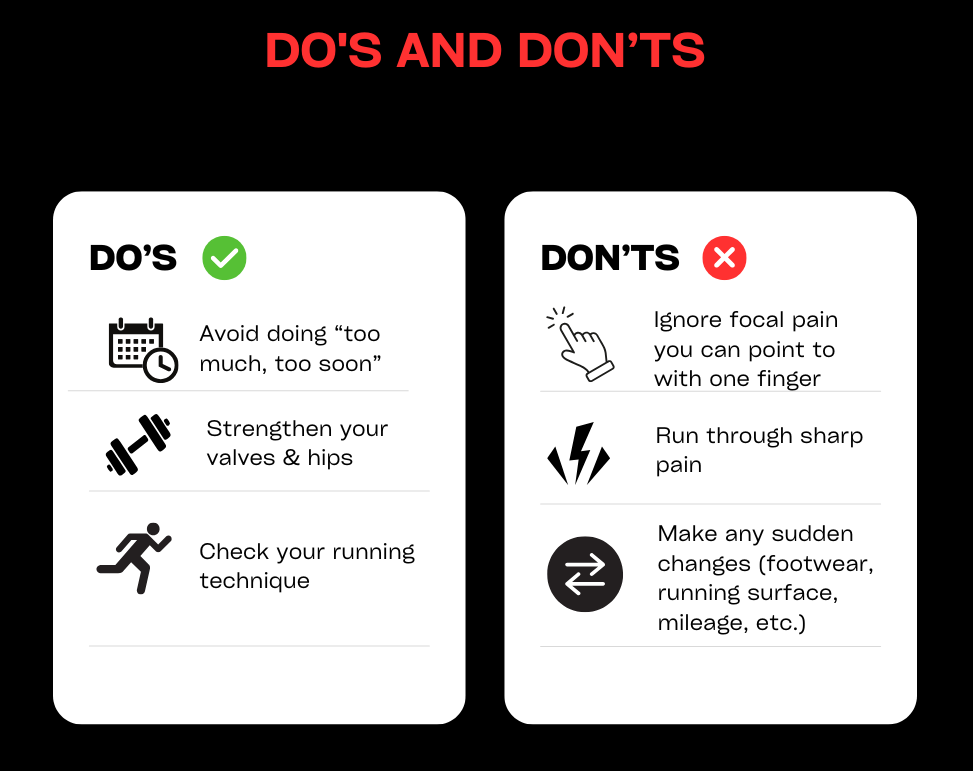
If you suspect shin splints, make an appointment with us.
Shoulder pain – impingement / instability
1. DEFINITION & ANATOMY
Shoulder pain is a common issue stemming from the joint’s unique design, which prioritises a vast range of motion over inherent stability. The shoulder is a complex ball-and-socket joint (the glenohumeral joint) where the head of the upper arm bone (humerus) sits in a shallow socket (the glenoid) on the shoulder blade (scapula). This mobility is managed by a group of four muscles and their tendons known as the rotator cuff, which act like dynamic ligaments to control movement and keep the joint centred. The whole complex is stabilised by the labrum (a cartilage rim that deepens the socket), ligaments, and a bursa that reduces friction.
Two main problems often arise, which can exist together:
- Shoulder Impingement (Subacromial Pain Syndrome): This occurs when soft tissues, such as the rotator cuff tendons or the bursa, get pinched or compressed in the narrow space (subacromial space) beneath the bony arch of the shoulder (the acromion).
- Shoulder Instability: This describes a situation where the humeral head moves excessively within the socket, ranging from subtle “micro-instability” to a full dislocation.
Common conditions we treat include:
- Rotator Cuff Tendinopathy/Tears: Irritation, inflammation, or damage to the rotator cuff tendons, often the supraspinatus tendon.
- Subacromial Bursitis: Inflammation of the bursa that sits between the rotator cuff and the acromion.
- Shoulder Instability: Often follows a traumatic dislocation or can develop over time in those with ligamentous laxity.
- Labral Tears (e.g., SLAP tear): Damage to the cartilage rim of the socket, which can affect stability and cause clicking or catching.
- Biceps Tendinopathy: Inflammation of the long head of the biceps tendon as it passes through the front of the shoulder.
2. SYMPTOMS & SIGNS
- Pain Location: Often felt as an ache over the front or side of the shoulder, which can radiate down the arm, typically not past the elbow. Instability may present as a less specific, deep-seated ache.
- Painful Arc: A classic sign of impingement where pain occurs as you lift your arm out to the side, typically between 60 and 120 degrees of elevation.
- Pain at Night: Difficulty sleeping on the affected side is a very common complaint, especially with rotator cuff issues.
- Weakness or Difficulty with Overhead Activities: Pain and/or weakness when reaching overhead, behind your back (e.g., doing up a bra), or lifting objects.
- Feelings of Instability: A sense of the shoulder feeling “loose,” “slipping,” or “giving way,” particularly in certain positions like throwing.
- Clicking, Popping, or Grinding: Mechanical sounds during movement can be associated with labral tears, instability, or degenerative changes.
- Red Flags: Inability to lift the arm after a fall or trauma could indicate a large rotator cuff tear. Numbness or tingling down the entire arm could suggest a nerve issue originating from the neck or shoulder.
3. CAUSES & RISK FACTORS
- Repetitive Overhead Activity: Common in sports like swimming, tennis, and volleyball, or occupations like painting and construction.
- Poor Posture: A forward-slumped posture can narrow the subacromial space, predisposing you to impingement.
- Muscle Imbalances: Weakness in the rotator cuff or the muscles that stabilise the shoulder blade (scapular stabilisers) can lead to poor joint mechanics.
- Sudden Injury: A fall onto an outstretched hand or a direct blow to the shoulder can cause traumatic tears, dislocations, or labral damage.
- Age-related Changes: Degenerative changes in the tendons can make them more susceptible to injury.
- Joint Laxity (Hypermobility): Naturally loose joints can predispose individuals to instability.
- Sudden Overload: A sudden increase in gym weights, a weekend of DIY, or an unaccustomed heavy lift.
4. HOW PHYSIOTHERAPY HELPS
- Assessment: Our first step is a comprehensive diagnosis. We take a detailed history of your symptoms and activities. The physical examination involves a series of movement tests and special clinical tests to identify which structures are involved (rotator cuff, bursa, labrum). We assess your posture, shoulder blade control, strength, and range of motion to find the root cause of the problem.
- Manual Therapy: We use hands-on techniques such as soft-tissue release for tight pectoral, upper back, and rotator cuff muscles. Joint mobilisations for the shoulder, thoracic spine, and neck can be used to restore normal movement and reduce stiffness.
- Exercise Therapy: This is the core of effective shoulder rehabilitation. You will receive a bespoke, progressive exercise programme designed to:
- Strengthen the rotator cuff and scapular stabilising muscles.
- Improve postural awareness and control.
- Restore full, pain-free range of motion.
- For instability, focus on dynamic control to keep the joint centred and secure.
- Education & Habit Change: Understanding your condition is key. We will educate you on which movements to temporarily avoid, how to modify your activities at work or in the gym, and provide ergonomic and postural advice to prevent recurrence.
- Adjuncts: Where appropriate, we may use taping techniques to support the shoulder or improve postural awareness. For persistent tendinopathies, shockwave therapy can be a highly effective treatment to stimulate healing, which we can provide in-clinic. If a significant structural injury is suspected, we can refer you to your GP or a specialist for imaging.
5. TIMELINE / EXPECTED RECOVERY
- Impingement / Bursitis / Mild Tendinopathy: With a consistent physiotherapy programme and activity modification, symptoms often start to improve significantly within 4-6 weeks.
- Chronic Rotator Cuff Tendinopathy: These can be more stubborn and often require a dedicated strengthening programme over 8-12 weeks or longer for full resolution.
- Instability: Rehabilitating an unstable shoulder focuses on building robust muscular control. This is a longer process, typically taking 3-6 months of consistent work.
- Post-Surgical Rehab: Following an operation (e.g., for a large tear or stabilisation), recovery is guided by the surgeon’s protocol but often spans 6-12 months.
6. SELF-HELP & PREVENTION
- During a Flare-up: Avoid repetitive overhead lifting and activities that cause sharp pain. Try to avoid sleeping directly on the painful shoulder; using pillows to prop yourself can help. Apply ice for 15 minutes to the painful area after activity.
- Gentle Movement: Perform gentle, pain-free pendulum swings and active-assisted movements (using your good arm to help the painful one) to maintain mobility.
- Build a Routine: To prevent future issues, focus on posture. Regularly stretch your chest muscles and incorporate strengthening exercises for your upper back and rotator cuff into your fitness routine 2-3 times per week.
7. WHEN TO SEE A PHYSIO OR SPECIALIST
If you feel in doubt about your diagnosis or your shoulder problem is not resolving book a physiotherapy assessment with one of our physiotherapists.
Finding the underlying cause of shoulder problems can be difficult, but our experienced team is here to help. Book an appointment to see us today with your shoulder pain.
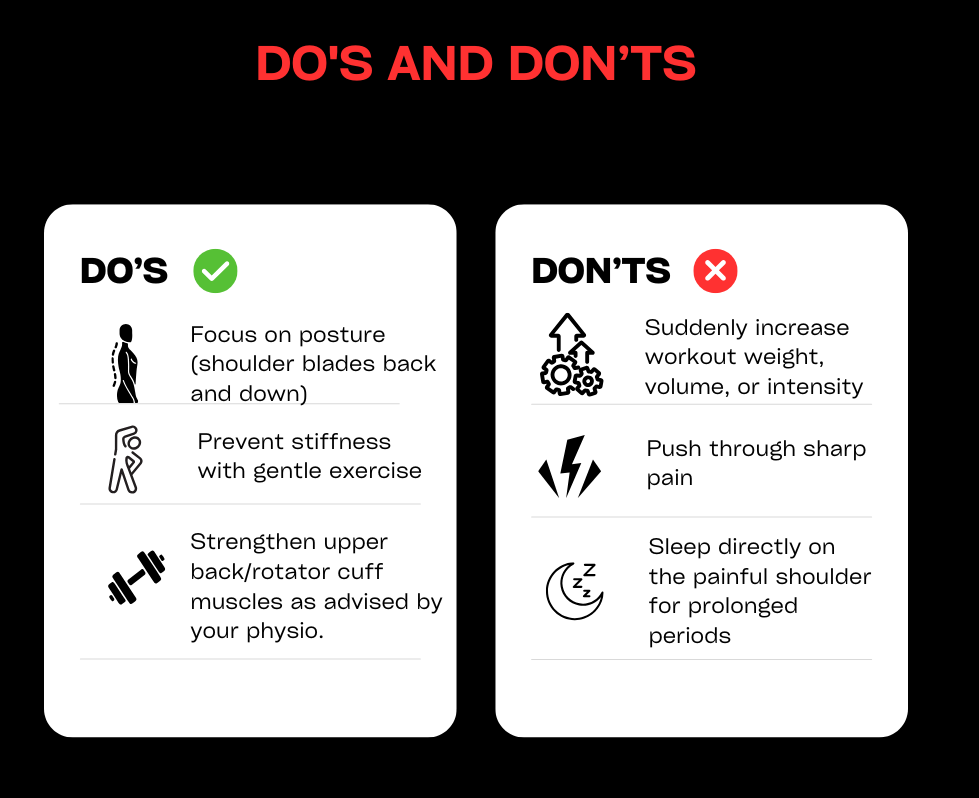
Tennis Elbow / Golfers’ Elbow (Lateral & Medial Elbow Tendinopathy)
1. DEFINITION & ANATOMY
Pain on the outer or inner side of the elbow is most commonly caused by a tendinopathy, which is an issue of tendon irritation and overload rather than simple inflammation. These conditions are related to the muscles of the forearm that control wrist and hand movements.
- Tennis Elbow (Lateral Epicondylalgia): This is the more common of the two, causing pain on the outside of the elbow. It involves the tendons of the wrist extensor muscles, which are responsible for bending the wrist backwards. The primary culprit is often the Extensor Carpi Radialis Brevis (ECRB) tendon at its attachment point on the lateral epicondyle (the bony lump on the outside of the elbow).
- Golfers’ Elbow (Medial Epicondylalgia): This affects the inside of the elbow. It involves the tendons of the wrist flexor and pronator muscles, which are used for gripping and bending the wrist forwards. These tendons attach to the medial epicondyle (the bony lump on the inside of the elbow).
It’s important to note that pain in this area can also be referred from the neck or be related to nerve irritation (e.g., the radial nerve), which we will assess for.
2. SYMPTOMS & SIGNS
- Pain Location: Tenderness and pain focused on the bony lump on the outside (Tennis Elbow) or inside (Golfers’ Elbow) of the elbow. The pain can radiate down into the forearm.
- Pain with Gripping: Symptoms are aggravated by activities that require a firm grip, such as shaking hands, turning a doorknob, carrying shopping bags, or holding a coffee cup.
- Pain with Wrist Movements: Pain is triggered when moving the wrist against resistance (e.g., lifting something with the palm down for Tennis Elbow, or palm up for Golfers’ Elbow).
- Morning Stiffness: The elbow and forearm can feel stiff and achy upon waking.
- Weakness: A feeling of weakness in your grip.
- No Obvious Trauma: The pain usually develops gradually over time rather than from a single incident.
- Red Flags: Numbness, tingling, or pins and needles in the hand or fingers may suggest a nerve issue, either at the elbow or referred from the neck. A sudden, traumatic injury with significant swelling and bruising requires urgent review.
3. CAUSES & RISK FACTORS
Despite the names, these conditions are not limited to tennis or golf players. Any activity involving repetitive use of the forearm muscles can be a cause.
- Repetitive Hand & Wrist Movements: Common in racket sports, but also in manual trades (plumbing, carpentry), DIY activities (using a screwdriver, painting), typing, or using a mouse.
- Sudden Overload: A sudden increase in activity, like a weekend spent gardening or playing a new sport, without building up tolerance.
- Poor Technique or Equipment: In sports, using a racket with the wrong grip size or poor swing mechanics can overload the forearm tendons. In the workplace, poor ergonomics can be a major factor.
- Weakness: A lack of strength in the forearm and shoulder muscles can lead to poor mechanics and place excessive strain on the elbow tendons.
- Age: Most common in adults between 30 and 50, as tendons can become less tolerant to strain with age.
4. HOW PHYSIOTHERAPY HELPS
- Assessment: We start with a detailed history to understand your activities and training loads. A thorough physical examination will identify the precise location of your pain through palpation and use specific tests to confirm which tendons are involved. We will assess your grip strength, muscle flexibility, and screen your neck and shoulder to rule out referred pain or nerve involvement.
- Manual Therapy: We use hands-on techniques like soft-tissue massage to the forearm muscles to reduce tension and pain. We may also use joint mobilisations for the elbow, wrist, or neck if stiffness is contributing to your symptoms.
- Exercise Therapy: This is the most crucial part of your recovery. You will receive a specific, graded loading programme designed to build the tendon’s capacity. This often starts with isometric exercises (static holds) for pain relief and progresses to eccentric and heavy slow resistance exercises to strengthen the tendon and surrounding muscles.
- Education & Habit Change: We will help you identify and modify the aggravating activities. This involves advice on load management, technique correction (in sport or at work), and ergonomic adjustments (e.g., mouse and keyboard setup).
- Adjuncts: We may use braces or clasps (‘epiclasps’) to offload the tendon during activity for short-term relief. Taping can also help to reduce pain. For stubborn, chronic cases, shockwave therapy is a highly effective option to stimulate the healing process.
5. TIMELINE / EXPECTED RECOVERY
- Acute/Recent Onset: If addressed early with appropriate load management and exercise, symptoms can improve significantly within 4-8 weeks.
- Chronic Tendinopathy: If the pain has been present for several months, it is a more persistent problem. A dedicated and consistent strengthening programme over 3-6 months is often required for a full and lasting recovery. The key is consistent loading, not complete rest.
6. SELF-HELP & PREVENTION
- During a Flare-up: Temporarily reduce or stop the specific activities that cause sharp pain (e.g., heavy gripping, repetitive wrist movements). It’s important to modify, not stop all activity.
- Gentle Movement: Perform gentle wrist range of motion exercises and pain-free isometric holds to manage pain and maintain function. Applying ice for 10-15 minutes can also help after an aggravating activity.
- Build a Routine: To prevent recurrence, ensure you have good forearm strength and flexibility. Warm up properly before sport or heavy manual work, and pay attention to your technique and equipment. Take regular breaks from repetitive tasks like typing.
7. WHEN TO SEE A PHYSIO OR SPECIALIST
If you feel in doubt about your diagnosis or your elbow problem is not resolving book a physiotherapy assessment with one of our physiotherapists.
We’ll help you find a solution that’ll alleviate your pain and prevent the problem from returning. Book an appointment today.
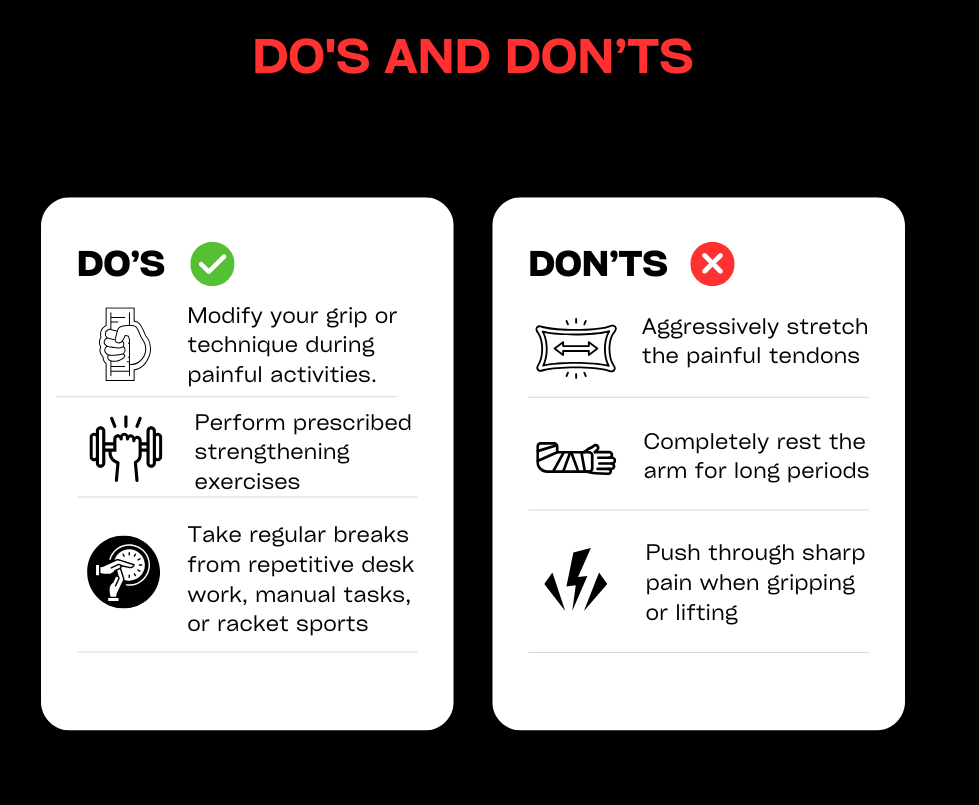
Thigh strains and ITB syndrome
1. DEFINITION & ANATOMY
Pain in the thigh is common among active individuals and can arise from either a muscle strain or an overuse condition like Iliotibial Band (ITB) Syndrome.
- Thigh Strains: These are acute injuries involving the tearing of muscle fibres. They are graded based on severity:
- Grade I: A mild strain with minor tearing of muscle fibres.
- Grade II: A moderate tear involving a significant portion of the muscle.
- Grade III: A complete rupture of the muscle.
This can happen to any of the major muscle groups in the thigh: the hamstrings (at the back), the quadriceps (at the front), or the adductors (on the inside).
- Iliotibial Band (ITB) Syndrome: This is an overuse condition, not a muscle strain. It causes pain on the outside of the knee. The ITB is a thick band of connective tissue that runs from the side of your hip down to just below your knee. ITB syndrome occurs when this band becomes irritated, often due to friction or compression as it passes over the bony prominence on the outer side of the femur (lateral femoral epicondyle) when the knee repeatedly bends and straightens.
2. SYMPTOMS & SIGNS
- Thigh Strains:
- A sudden, sharp pain in the front, back, or inside of the thigh during an activity like sprinting or kicking.
- A “popping” or tearing sensation at the time of injury.
- Pain when stretching the affected muscle or using it against resistance.
- Swelling and bruising (which may appear a day or two after the injury).
- In a Grade III tear, there may be a palpable gap in the muscle and a significant loss of function.
- ITB Syndrome:
- A sharp or burning pain on the outer side of the knee.
- Pain that typically starts after a certain period of running and worsens as the run continues, forcing you to stop.
- The pain often subsides with rest but returns with the next run.
- Tenderness when pressing on the outer side of the knee.
- Pain may be worse when running downhill or descending stairs.
- Red Flags: An inability to walk or bear weight after an injury, a visible deformity, or a large, palpable gap in the muscle may indicate a complete rupture and warrants urgent assessment. Deep, localised bone pain could suggest a stress fracture.
3. CAUSES & RISK FACTORS
- Thigh Strains:
- Sudden Acceleration/Deceleration: Activities like sprinting, jumping, or kicking place high demands on the thigh muscles.
- Inadequate Warm-up: Cold muscles are less flexible and more prone to tearing.
- Muscle Fatigue: Over-tired muscles are less able to absorb shock and are more susceptible to injury.
- Muscle Imbalances: For example, significantly stronger quadriceps compared to hamstrings can increase the risk of a hamstring strain.
- Previous Injury: A prior strain can leave scar tissue, making the muscle more vulnerable to re-injury.
- ITB Syndrome:
- Rapid Increase in Training Volume: A sudden spike in running mileage is a classic cause.
- Running Technique: An over-striding gait or a “crossover” running pattern (where feet land across the body’s midline) can increase strain on the ITB.
- Weakness in Hip Muscles: Weakness in the gluteal muscles (particularly gluteus medius) can lead to poor pelvic control and increased tension through the ITB.
- Excessive Downhill Running.
4. HOW PHYSIOTHERAPY HELPS
- Assessment: A precise diagnosis is vital. For thigh strains, we conduct a thorough physical examination to grade the injury, identify the exact muscle involved, and test your strength and flexibility. For ITB syndrome, we assess your pain patterns and perform specific clinical tests. A key part of our assessment is a biomechanical analysis, including observing your walking and running gait, to identify underlying causes like muscle weakness or poor technique.
- Manual Therapy: In the early stages, we use techniques like soft-tissue massage to the surrounding areas to manage pain and swelling. As you recover, we can use more specific techniques to improve tissue mobility.
- Exercise Therapy: This is the foundation of recovery and prevention. You will receive a structured, progressive rehabilitation programme:
- For Strains: We start with gentle isometric holds for pain relief, progressing to strengthening exercises (eccentrics and heavy slow resistance), and finally reintroducing dynamic, sport-specific movements like hopping, plyometrics, and a guided return-to-running plan.
- For ITB Syndrome: The focus is on strengthening the hip and gluteal muscles to improve control and reduce strain on the ITB, alongside load management.
- Education & Load Management: We teach you how to modify your training to allow the tissue to heal without becoming deconditioned. We will guide you on how to structure a safe and gradual return to your sport.
- Adjuncts: We may use taping techniques to offload injured tissue. For chronic tendinopathies that sometimes accompany muscle strains, shockwave therapy can be an effective treatment option. If a complete rupture is suspected, we will refer you for an urgent scan.
5. TIMELINE / EXPECTED RECOVERY
- Grade I Strain: Typically requires 2–4 weeks of rehabilitation before a return to sport.
- Grade II Strain: Often takes 4–8 weeks, requiring a more comprehensive strengthening programme.
- Grade III Strain / Rupture: These are significant injuries. A complete rupture can take 3–6 months or longer to fully rehabilitate, and sometimes requires surgical review.
- ITB Syndrome: With appropriate load management and a targeted strengthening programme, symptoms often improve significantly within 4–8 weeks.
6. SELF-HELP & PREVENTION
- During a Flare-up: For an acute strain, follow the PEACE & LOVE principle (Protection, Elevation, Avoid Anti-inflammatories, Compression, Education & Load, Optimism, Vascularisation, Exercise). For ITB syndrome, temporarily reduce running volume to a level that does not provoke pain.
- Gentle Movement: For strains, start gentle, pain-free mobility and isometric exercises as soon as possible. For ITB syndrome, focus on gluteal activation exercises.
- Build a Routine: To prevent recurrence, incorporate regular strengthening for the hamstrings, glutes, and quadriceps into your weekly routine. Always warm up thoroughly before sport and avoid sudden, dramatic increases in training intensity or volume.
7. WHEN TO SEE A PHYSIO OR SPECIALIST
If you feel in doubt about your diagnosis or your thigh problem is not resolving book a physiotherapy assessment with one of our physiotherapists.
A complete rupture can sometimes take between nine and 12 months to heal, so don’t put off an appointment for thigh strains and ITB issues. Book to come and see us ASAP.
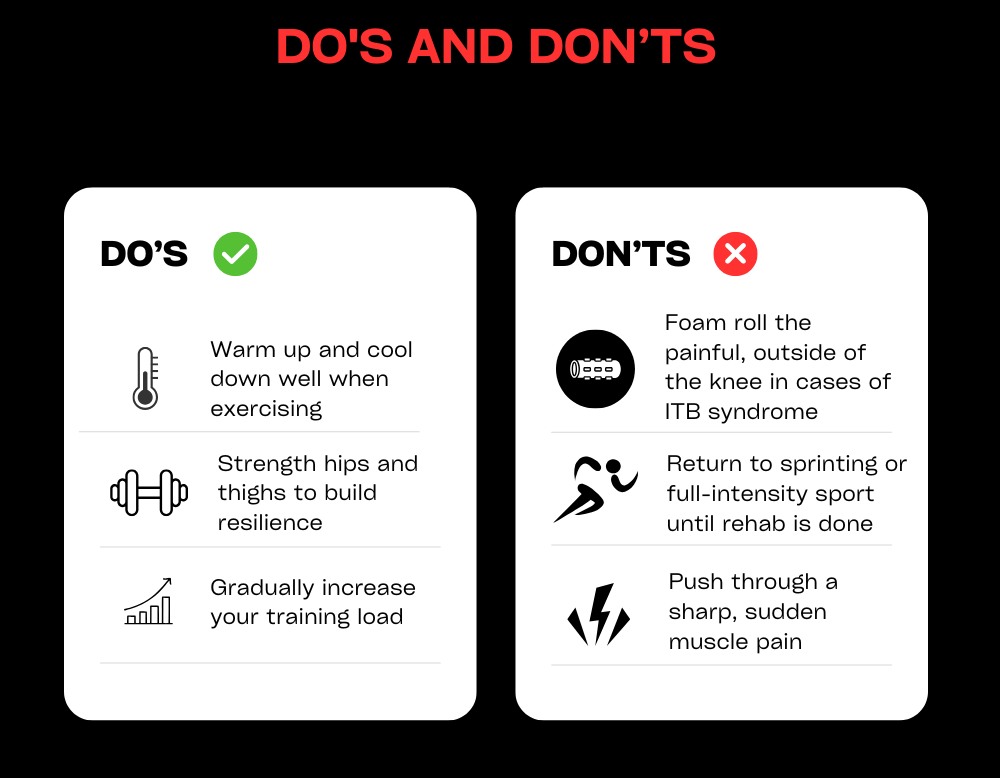
Whiplash
Whiplash (Neck Sprain/Strain)
1. DEFINITION & ANATOMY
Whiplash, more accurately termed Whiplash Associated Disorder (WAD), is a neck injury caused by a rapid, forceful back-and-forth movement of the head, similar to the cracking of a whip. It is not a specific diagnosis but rather a mechanism of injury that can damage a wide range of structures in the neck, including the facet joints, intervertebral discs, ligaments, muscles, and nerves.
This sudden acceleration-deceleration force can cause a sprain (to ligaments) and a strain (to muscles) throughout the cervical spine. The complexity of the injury means it can produce different types of pain, from mechanical joint pain to inflammatory muscle pain and even nerve-related (neurogenic) pain if nerve roots are irritated.
2. SYMPTOMS & SIGNS
A key characteristic of whiplash is that symptoms do not always appear immediately; they can develop or worsen over the 24-48 hours following the incident.
Common symptoms include:
- Neck Pain and Stiffness: The most common complaint, making it difficult to turn your head or look up and down.
- Headaches: Often starting at the base of the skull and radiating to the forehead, commonly called cervicogenic headaches.
- Pain in the Shoulders or Upper Back: Pain can spread from the neck into the trapezius muscles and between the shoulder blades.
- Radiating Arm Symptoms: If a nerve is irritated, you may experience tingling, numbness, or pain travelling down your arm into your hand.
- Dizziness or Light-headedness: Can occur due to injury to the joints and sensors in the neck that contribute to balance.
- Jaw Pain (TMJ Pain): The rapid movement can sometimes affect the temporomandibular joint.
- Fatigue and Disturbed Sleep: Pain and stiffness often make it difficult to find a comfortable sleeping position.
- Red Flags: While rare, severe symptoms like loss of bladder/bowel control, significant weakness in both arms or legs, or a complete loss of sensation require immediate emergency medical attention. Dizziness accompanied by fainting, slurred speech, or difficulty swallowing (the ‘5 D’s and 3 N’s’) also warrants urgent review.
3. CAUSES & RISK FACTORS
While most commonly associated with car accidents, whiplash can be caused by any event that makes the head jerk suddenly.
- Road Traffic Accidents: The most frequent cause, particularly rear-end collisions.
- Contact Sports: A heavy tackle in rugby, a fall in football, or a collision in martial arts.
- Slips, Trips, and Falls: Falling unexpectedly where your head is jolted.
- Amusement Park Rides: Rollercoasters or other rides that involve rapid changes in direction.
- Physical Assault: A direct blow to the head or being shaken.
4. HOW PHYSIOTHERAPY HELPS
Early and appropriate intervention is key to a successful recovery and preventing long-term problems. The focus of modern physiotherapy for whiplash is reassurance and a return to normal movement.
- Assessment: We will conduct a thorough assessment, starting with a detailed history of the incident. Our physical examination will include specific tests to assess your neck’s range of motion, muscle function, and nerve sensitivity. Crucially, we will screen for any red flags and provide reassurance, as fear of movement can be a major barrier to recovery.
- Education: Understanding your injury is the first step. We will explain why you are feeling pain, reassure you that hurt does not necessarily equal harm, and guide you on what to expect during recovery. We will teach you how to manage your daily activities, such as driving and working.
- Graded Movement and Exercise: The most important treatment for whiplash is movement. We will prescribe a gentle, progressive exercise programme to restore your range of motion, retrain muscle control, and gradually strengthen the deep stabilising muscles of your neck.
- Manual Therapy: We may use gentle, hands-on techniques such as soft-tissue release for tight muscles and joint mobilisations to help reduce pain and improve movement, allowing you to engage more effectively with your exercises.
- Postural and Ergonomic Advice: We provide practical advice on your workstation setup, driving position, and posture to minimise strain on your neck as it recovers.
- Adjuncts: We can advise on the appropriate use of heat or ice for symptom relief. Kinesiology taping may also be used to provide support or reduce muscle tension. Imaging (like X-rays or MRIs) is often not necessary, but we can liaise with your GP to arrange this if we have any clinical concerns.
5. TIMELINE / EXPECTED RECOVERY
- The majority of people with whiplash recover well. Significant improvement is usually seen within the first 6-12 weeks.
- It is normal for some low-level, intermittent symptoms to persist for several months as the tissues fully remodel.
- A small percentage of people can develop more persistent, chronic pain. Early physiotherapy intervention significantly reduces this risk.
6. SELF-HELP & PREVENTION
- Stay Active: The most important advice is to keep moving as normally as possible. Complete rest and using a collar are no longer recommended as they can lead to more stiffness and delayed recovery.
- Gentle Movement: Perform gentle neck range of motion exercises (side-to-side, up-and-down) within a comfortable range, multiple times a day.
- Pain Relief: Use heat packs to help relax tense muscles. Follow your GP’s advice regarding pain medication to help you stay active.
- Good Posture: Be mindful of your posture when sitting, standing, and using screens.
7. WHEN TO SEE A PHYSIO OR SPECIALIST
If you feel in doubt about your diagnosis or your whiplash problem is not resolving book a physiotherapy assessment with one of our physiotherapists.
Book an appointment with one of our physios today.
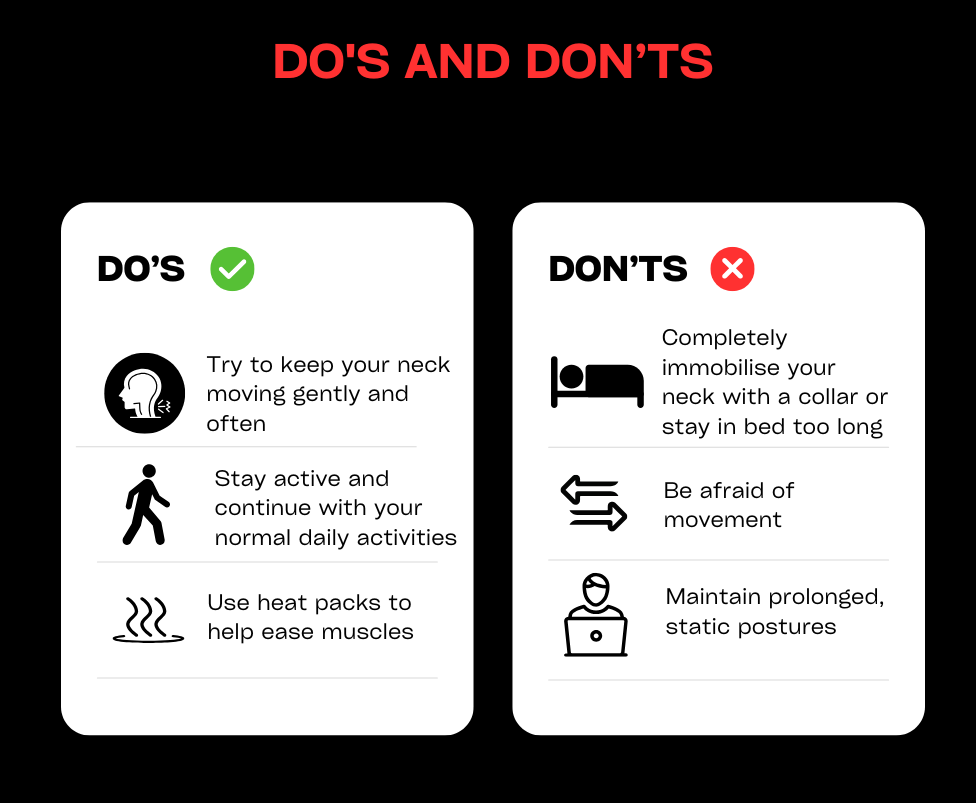
Women’s Health Physiotherapy/Pelvic Health/Mummy MOT
1. DEFINITION & AREAS WE SUPPORT
Women’s Health Physiotherapy is a specialist area dedicated to supporting women through all stages of life, from pregnancy and the postnatal period to perimenopause, menopause, and beyond. It focuses on the assessment, treatment, and management of conditions related to the pelvic floor, abdomen, and musculoskeletal system.
Many women experience issues like pelvic floor weakness, abdominal separation, or bladder and bowel problems, particularly after childbirth or during hormonal changes. These conditions are common, but they are not something you have to live with. Specialist physiotherapy provides the knowledge, targeted treatment, and correct exercises to restore function, reduce pain, and empower you to live an active, confident life.
We’re lucky enough to have a dedicated Women’s Health Physiotherapist at W5Physio. Learn more about Vicky here. The support she provides includes:
- Pregnancy & Postnatal Recovery: Preparing for birth, recovering from delivery (vaginal or c-section), treating Diastasis Recti (tummy gap), and safely returning to exercise. We are also certified providers of the Mummy MOT.
- Pelvic Floor Dysfunction: Addressing weakness, overactivity (tension), pain, and symptoms of Pelvic Organ Prolapse.
- Bladder & Bowel Health: Managing incontinence (stress and urge), urgency, frequency, constipation, and issues with emptying.
- Menopause Transition: Supporting the body through perimenopause and menopause, addressing issues like vaginal dryness, joint pain, and changes to pelvic health.
- Sexual Dysfunction: Helping with pain during intercourse (dyspareunia) and other intimacy-related issues.
2. COMMON SYMPTOMS & SIGNS
You may benefit from seeing a Women’s Health physiotherapist if you experience any of the following:
- Bladder Leakage: Leaking urine when you cough, sneeze, laugh, jump, or run (stress incontinence).
- Urgency: A sudden, desperate need to go to the toilet, which can sometimes result in leakage (urge incontinence).
- Pelvic Heaviness or Dragging: A sensation of something “coming down” inside the vagina, which can be a sign of Pelvic Organ Prolapse.
- Tummy Gap or “Doming”: A visible gap or bulging along the midline of your abdomen, known as Diastasis Recti.
- Pelvic or Lower Back Pain: Persistent pain in the pelvis, hips, or lower back that hasn’t responded to other treatments.
- Painful Sex: Discomfort or pain during or after intercourse.
- Bowel Issues: Difficulty with constipation, straining, or a feeling of incomplete emptying.
- Menopause-related Symptoms: New or worsening joint aches, vaginal dryness, or changes in your bladder habits.
3. CAUSES & RISK FACTORS
These conditions can develop for many reasons and are influenced by hormonal changes and physical stresses throughout a woman’s life.
- Pregnancy and Childbirth: The weight of the growing baby and the process of delivery place significant strain on the pelvic floor and abdominal muscles.
- Menopause: The decline in oestrogen during perimenopause and menopause can affect muscle mass, tissue elasticity, and joint health, impacting the pelvic floor and contributing to bladder symptoms.
- High-Impact Exercise: Repetitive jarring activities like running can place stress on the pelvic floor if it isn’t functioning optimally.
- Chronic Straining: Long-term constipation or persistent coughing can weaken the pelvic floor over time.
- Poor Posture and Lifting Technique: Incorrect mechanics can increase pressure on the abdomen and pelvic floor.
- Previous Surgery: Gynaecological or abdominal surgery can affect pelvic floor and core function.
4. HOW PHYSIOTHERAPY HELPS
So much can be achieved through correct knowledge, treatment, and exercise. Our approach is sensitive, confidential, and tailored to you.
- Specialist Assessment: We start with a detailed conversation about your symptoms, history, and goals. This may include a comprehensive pelvic health assessment, which can involve an internal pelvic floor examination. This is the gold standard for accurately assessing muscle strength, tone, and coordination, but it is only ever performed with your informed consent and utmost comfort. We are also official providers of the Mummy MOT, a detailed postnatal check-up.
- Education and Lifestyle Strategies: We empower you with knowledge about your body. We provide practical advice on bladder and bowel habits, fluid intake, diet, and strategies to manage your symptoms in daily life.
- Pelvic Floor Muscle Training: We teach you how to correctly contract, relax, and coordinate your pelvic floor muscles. It’s not just about squeezing; it’s about restoring optimal function, whether the issue is weakness or over-tension.
- Core Rehabilitation: We guide you through a safe and progressive exercise programme to address Diastasis Recti and rebuild your core strength from the inside out.
- Manual Therapy: We may use hands-on techniques to release tight muscles in the pelvis, back, and hips that may be contributing to your pain.
- Return to Exercise Guidance: We provide a structured plan to help you safely return to the activities you love, whether it’s running, weightlifting, or yoga, without aggravating your symptoms.
- Collaboration: We work closely with your GP, gynaecologist, or other specialists and can provide onward referrals when necessary.
5. TIMELINE / EXPECTED RECOVERY
- Recovery is highly individual. For postnatal recovery or managing incontinence, many women notice significant improvements within 6-12 weeks of starting a consistent, targeted programme.
- More chronic or complex conditions, such as pelvic pain or prolapse management, may require a longer-term approach over 3-6 months to build strength and change habits.
- The key is consistency. Our goal is to give you the tools and confidence to manage your health for the long term.
6. SELF-HELP & PREVENTION
- Mindful Movement: Pay attention to your posture and learn how to lift correctly, using your legs and engaging your core to avoid straining.
- Bowel Health: Avoid straining on the toilet. A healthy diet rich in fibre and adequate fluid intake are crucial for preventing constipation.
- Learn to Relax Your Pelvic Floor: Your pelvic floor needs to relax just as much as it needs to contract. Practice diaphragmatic (belly) breathing to help release tension.
- Be Patient Postnatally: Allow your body time to heal after birth. Avoid high-impact exercise until you have rebuilt your core and pelvic floor foundations.
7. WHEN TO SEE A PHYSIO OR SPECIALIST
These conditions should not be something you just “put up with” because you have had a baby or are going through menopause. It’s time to book an appointment if:
- You leak urine or faeces, no matter how small the amount.
- You feel a sense of heaviness or a bulge in your vagina.
- You have pain in your pelvis, lower back, or during sex.
- You have had a baby and want a comprehensive check-up (Mummy MOT) to guide your recovery.
- You are entering perimenopause or menopause and want to proactively manage your pelvic and musculoskeletal health.
Learn more about the Mummy MOT here. Or, book in today for the health check you deserve.
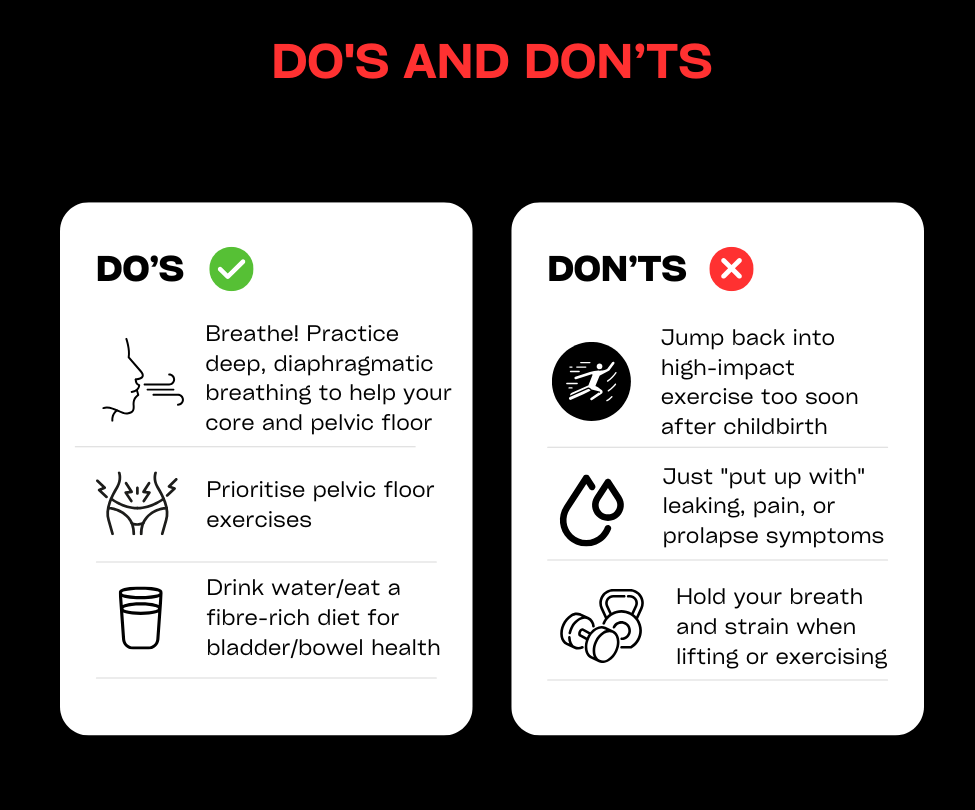
Wrist Pain and Strains
1. DEFINITION & ANATOMY
The wrist is an incredibly complex joint, made up of eight small carpal bones connecting the two forearm bones (radius and ulna) to the hand. This intricate structure allows for a wide range of movement but also makes it vulnerable to injury. Wrist pain can stem from a sudden traumatic event or develop gradually through repetitive strain.
Common conditions we treat include:
- Ligament Sprains: Overstretching or tearing of the ligaments that connect the wrist bones, often from a fall.
- Tendinopathies: Irritation or degeneration of the tendons that cross the wrist, such as those controlling thumb movement (De Quervain’s Tenosynovitis) or wrist movement (ECU/FCR Tendinopathy).
- Triangular Fibrocartilage Complex (TFCC) Injury: Damage to the main stabilising structure on the little-finger side of the wrist, often from a fall or forceful twisting.
- Repetitive Strain Injury (RSI): A general term for pain in the muscles, nerves, and tendons caused by repetitive movement and overuse, common in office workers.
- Carpal Tunnel Syndrome: While primarily a nerve issue, its symptoms of tingling, numbness, and ache in the hand and wrist are frequently seen and managed in clinic.
- Post-Fracture Stiffness & Weakness: Rehabilitating the wrist after a fracture (e.g., of the scaphoid or distal radius) has healed.
2. SYMPTOMS & SIGNS
- Pain Location: Can be specific, such as at the base of the thumb (De Quervain’s), on the little-finger side of the wrist (TFCC), or a more general ache across the joint.
- Pain with Movement: Symptoms are often aggravated by specific motions like turning a key, opening a jar, typing, or bending the wrist back.
- Swelling: Noticeable puffiness around the wrist joint, particularly after an acute injury.
- Weakness: A loss of grip strength or difficulty carrying heavy objects.
- Clicking, Popping or Catching: Mechanical symptoms that may indicate a ligament or TFCC injury.
- Nerve Symptoms: Tingling, numbness, or a burning sensation in the fingers and hand, classic signs of nerve irritation like in Carpal Tunnel Syndrome.
- Red Flags: Severe pain, a visible deformity, or an inability to move the wrist after a fall could indicate a fracture (like to the scaphoid bone) and requires immediate medical assessment.
3. CAUSES & RISK FACTORS
Wrist pain can be broadly divided into traumatic and overuse injuries.
- Traumatic Injury: The most common cause is a Fall On an Outstretched Hand (FOOSH). This can lead to fractures, sprains, or TFCC tears.
- Repetitive Overload (RSI):
- Desk Work: Long hours spent typing or using a computer mouse with poor ergonomic setup is a major contributor.
- Mobile Phone Use: The “scrolling” thumb motion can lead to conditions like De Quervain’s.
- Manual Work: Trades involving repetitive use of hand tools.
- Sports:
- Racket sports (tennis, badminton): Forceful, repetitive wrist movements.
- Gymnastics & Yoga: High weight-bearing loads through the hands and wrists.
- Basketball: Impact from catching the ball or falls.
- New Activities: A sudden increase in a new activity, such as taking up knitting, playing an instrument, or starting a new gym programme.
4. HOW PHYSIOTHERAPY HELPS
Physiotherapy has excellent success rates for wrist problems, focusing on accurate diagnosis and a targeted recovery plan.
- Assessment: We perform a thorough assessment to pinpoint the source of your pain. This includes a history of your activities, specific tests for ligaments, tendons, and nerves (e.g., Finkelstein’s test for De Quervain’s), and an evaluation of your grip strength and range of motion. We are trained to screen for potential fractures and will refer you for imaging if necessary.
- Manual Therapy: We use hands-on techniques such as joint mobilisations to restore movement in stiff wrist bones and soft-tissue release for tight forearm muscles, which can help to offload irritated tendons.
- Exercise Therapy: A progressive loading programme is vital for recovery. We will guide you from gentle range-of-motion and pain-relief exercises (isometrics) through to a comprehensive strengthening plan for the wrist and grip. This builds the capacity of the tendons and support structures to cope with your daily demands.
- Ergonomics and Technique Advice: We will analyse your desk setup, typing technique, or sports grip and provide practical advice on how to modify these to reduce strain. This is a crucial step in preventing the problem from returning.
- Adjuncts: We may use splints or braces for short-term support and pain relief. Taping can also be effective in offloading irritated structures. For certain chronic tendinopathies, shockwave therapy can be a useful treatment option.
5. TIMELINE / EXPECTED RECOVERY
- Mild Sprains and Tendinopathies: With early intervention and activity modification, these can often resolve within 2–6 weeks.
- Chronic Conditions (e.g., De Quervain’s): If symptoms have been present for a while, recovery may take 6–12 weeks of consistent rehabilitation.
- Significant Ligament or TFCC Injuries: These can be more complex and may require a longer rehabilitation period of 3 months or more.
- Post-Fracture: Rehabilitation starts after the cast is removed and focuses on regaining movement and strength over an 8-12 week period.
6. SELF-HELP & PREVENTION
- During a Flare-up: Modify or temporarily reduce the activities that cause pain. Avoid forceful gripping and repetitive movements. Ice can be helpful for acute injuries to manage swelling.
- Ergonomic Awareness: Take regular breaks from typing or using a mouse. Ensure your desk setup allows your wrists to be in a neutral, relaxed position.
- Build a Routine: To prevent recurrence, incorporate regular wrist-strengthening and stretching exercises into your routine, especially if you have a desk job or play a wrist-dominant sport.
7. WHEN TO SEE A PHYSIO OR SPECIALIST
If you feel in doubt about your diagnosis or your wrist problem is not resolving book a physiotherapy assessment with one of our physiotherapists.
The good news is physiotherapy has great success rates for wrist problems. So don’t delay in booking to see us with your wrist pain or strain.
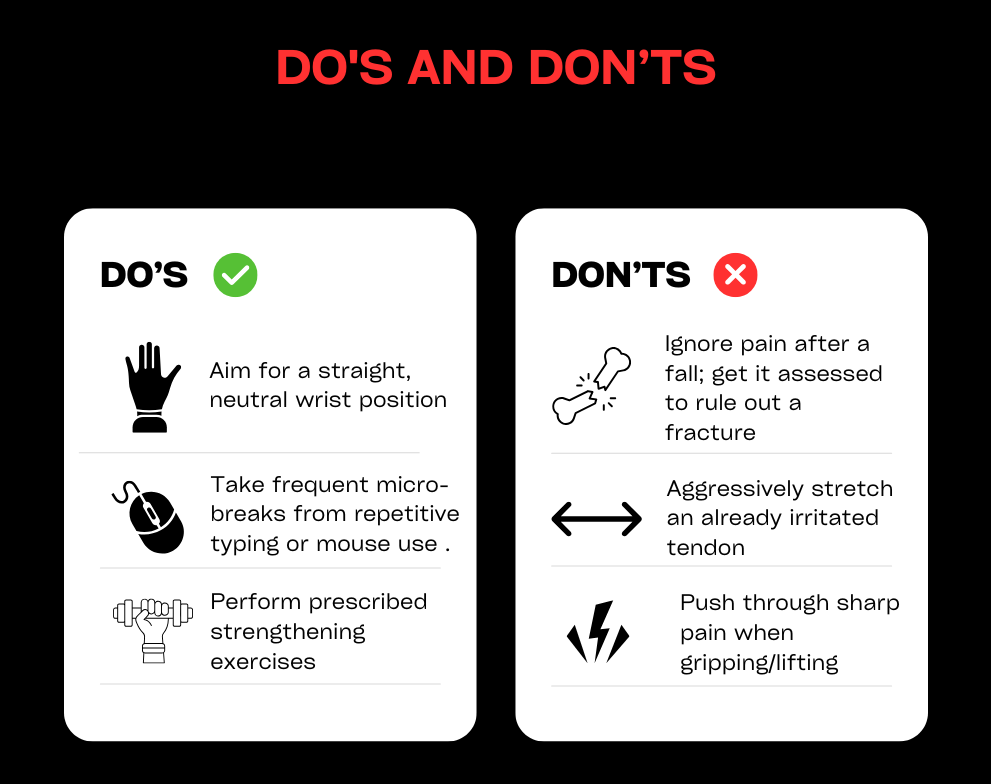
Your First Visit
Diagnose
On your first visit we’ll ask you lots of questions to identify the best course of action and make sure physio can help you.
We’ll need access to the body part causing issues, so remember to wear suitable clothing so that we can carry out some physical tests.
Treat
In your first session, we’ll normally start treatment too. It’ll be tailored to you specific needs and condition.
It could include hands-on manipulation, prescribed exercises and sometimes also sports massage or acupuncture.
Cure
Curing you means working with you, rather than simply telling you what to do. We aim to achieve long-lasting results with every single patient, so expect a personal, bespoke treatment plan and approach.
Meet Our Team
Client Reviews
Toni
The service and care that the W5 team offer their clients is absolutely first class. Professional...
Agata
I have been a patient at W5 physio for over 6 years now. The quality of...
Kath
From the friendly and efficient receptionists to superb treatment from Sashka my physiotherapist I can thoroughly...
Britta
I have used them on several occasions. Each time I have been completely satisfied with the...
In Partnership With